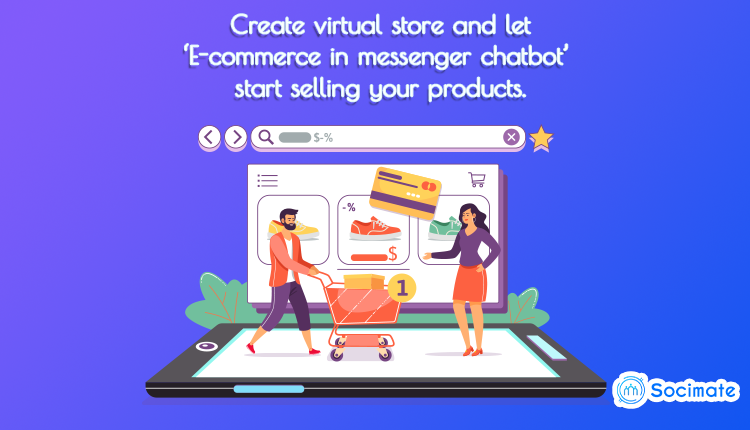
How to create virtual store on ChatPion’s “E-commerce in messenger” interface
ChatPion’s “E-commerce in messenger chatbot” is a special feature of ChatPion, the world’s best marketing-related software, brought to you by XeroneIT. This unique chatbot can sell your products via Facebook Messenger spontaneously. You just have to create a virtual store from the easy-to-handle interface to make the “E-commerce in messenger chatbot” able to sell your products, creating a virtual store that is very easy. Once the virtual store is created, you don’t have to worry about selling your products, since the chatbot itself will sell your products on behalf of you.
To make the chatbot able to sell your products, first, you have to create a virtual store from E-commerce in messenger’s easy-to-handle interface—creating a virtual store is very easy. That is, you don’t necessarily have to be skilled in technology to create a virtual store. After creating your virtual store, you have set the bot from the ‘bot settings’ interface so that your chatbot can run your virtual store.
ChatPion is marketing-related software that does marketing of your products and sells them via social media, especially Facebook. Therefore, to use ChatPion, first, you have to import your Facebook account that has at least one Facebook page.
How to import your Facebook account?
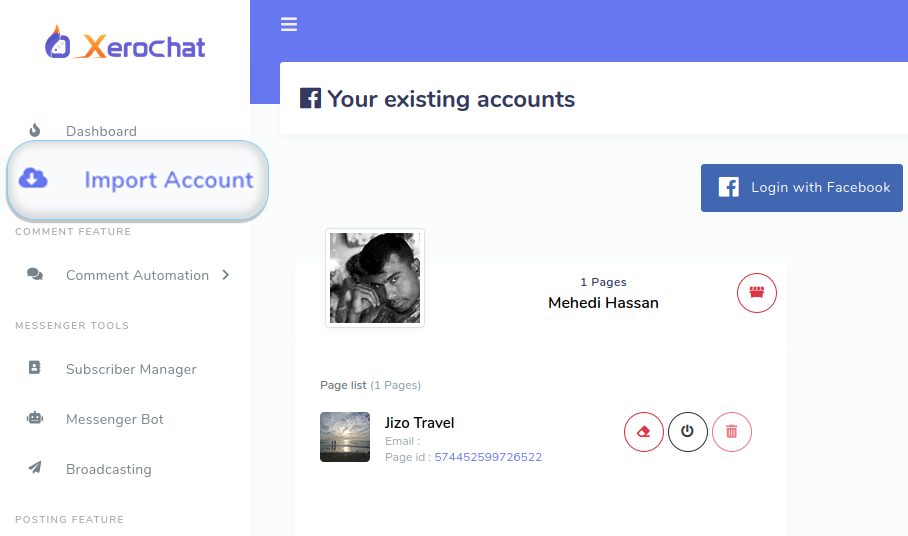
First, log in to ChatPion and right away, ChatPion’s well-developed Dashboard will appear. To import your Facebook account, go to the left panel of the ChatPion Dashboard and click on the “Import Account” option and a page called ‘Your existing accounts’ will appear. Click on the ‘Login with Facebook’ button and import your Facebook account. Now you can see your Facebook account and Facebook page or pages listed below on the dashboard. You can also import another Facebook account by clicking on the ‘Login with Facebook’ button that is still on the very page. Thus, you can import as many Facebook accounts as you want.
How to create a virtual store?
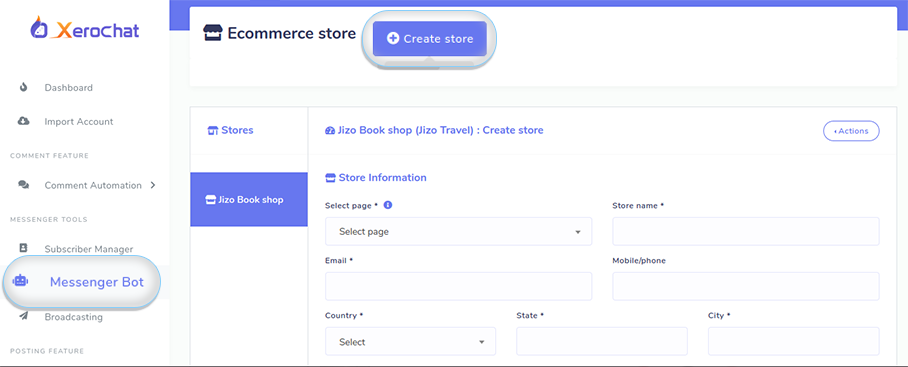
To create your virtual store, go to the left panel of the dashboard and click on the “messenger bot” option, and instantly, a page called ‘Messenger Bot’ will appear. On this page, you will see all the functionality of the messenger bot. Scroll down to the last of the page and you will see the “Messenger E-commerce store” option at the last of the right column. Click on the “action” button below and a drop-up menu of “Stores” and “Payment accounts” will appear. Click on the “Payment accounts” and a form called “E-commerce payment accounts account” will appear. Fill up the form with your PayPal and Stripe account details. You can also write the instructions for Manual Payment in the box called “Manual payment instructions”. Besides, you can also enable “Payment sandbox mode” by checking the radio button. If you fill-up the form, you can enable these two checkout options, “PayPal” and “Stripe”, while creating your store, otherwise not.
Now click on the ‘Stores’ button and a page called “E-commerce store” will come into view. At the top of the page, you will see a button called ‘Create store’. Click on the ‘Create store’ button and a form called “Store information” will come up on the same page. To create a store initially, you have to fill the form up first.
Now select your Facebook page by clicking on the box called “Select page”, the Facebook page that will be integrated with “E-commerce in messenger chatbot’. Then write your store name to the ‘Store name’ box. Then provide your Email and mobile/ phone number. Then give your shop’s address. Now configure your Tax in the box called ‘Tax%’ and write the amount of Shipping fee in the ‘Shipping fee box’. Now you have to enable your checkout options such as PayPal Checkout, Stripe Checkout, Manual Checkout, and Cash On delivery Checkout. “Cash on delivery” is the default.
Now upload your business logo and favicon. Then write your business’s Terms of Service and Refund policy. You can change your shop’s status if it is online or offline anytime by clicking on the radio button called ‘Online’.
Now you will see the “Confirmation message” option. Confirmation messages will be sent to your clients after they checkout. A confirmation message includes greetings in text, “Order confirmation” with price and quantity of the products, “Payment method”, “Delivery address”, “Total amount”, and a button called “My Orders”. By clicking on the “My orders” button, your clients can see their order history and status. A greeting is already written in the “Messenger content” box but you can write the greetings yourself. Confirmation message via messenger is the default. And you can send the same confirmation message to your clients via SMS and email as well.
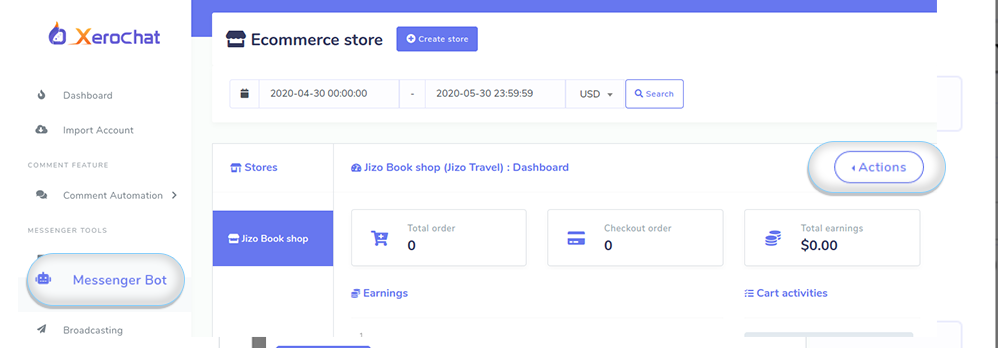
Now click on the ‘Create store’ button’ and your store will be created instantly. You will see your store loaded under the “Stores” menu. This page will work as your store’s Dashboard. You will see your “Total orders”, “Cashout orders” and “Total earnings” here. You can also create another store by clicking on the ‘Create store’ button at the top of the page in the same way you just created one- you can create as many stores as you want.
How to arrange your store?
Once you have created your store, it is time to arrange your store. On the right side of the page called “Ecommerce store” you will see a button called ‘Action’. Now click on the ‘Action’ button and a drop-down menu will appear. Here you will see some menus such as Dashboard, Products, Coupon, Categories, Attributes, Orders, Copy URL, Visit store, Edit store, and Delete store.
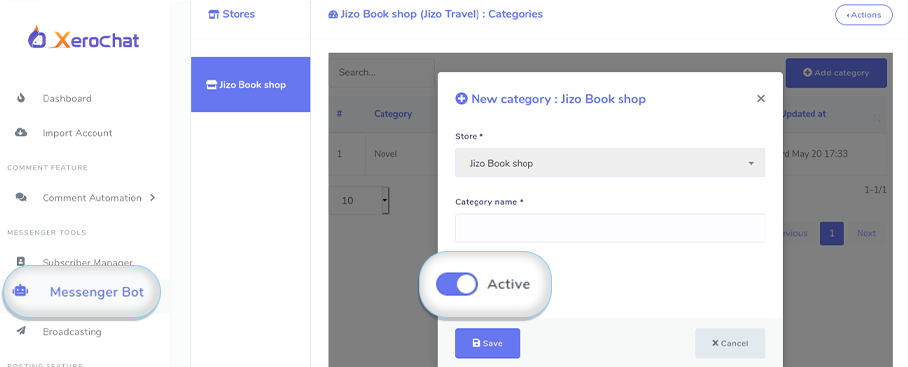
How to add categories?
Well, first you have to go to the menu called ‘Categories’ to add a category for your products. Click on ‘Categories’ and a new page will appear. Click on the button called ‘Add category’ and a pop-up box called ‘New category: your shop name’ will appear. Now write your category name in the box called ‘Category name.” Then click on the ‘Save’ button. Now your category is saved and will appear on the page. You can edit and delete the category by clicking on the ‘edit’ and ‘delete’ button. Well, in this way, you can add many categories for your product. You can make the category inactive by unchecking the radio button called ‘Active’.
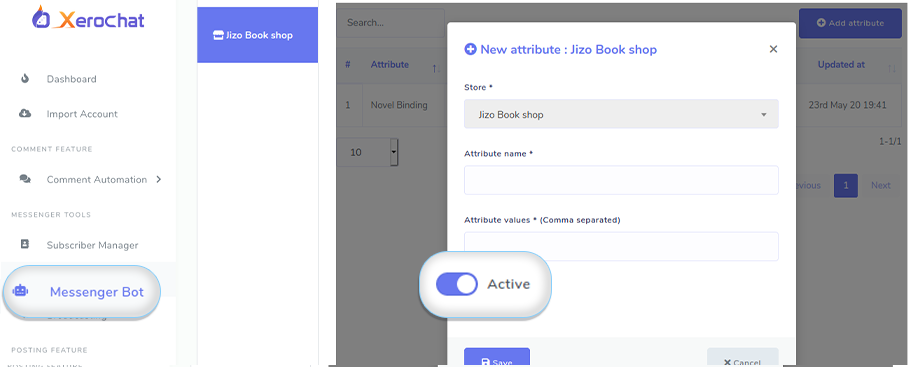
How to add attributes for your products?
Now you have to go to the menu called ‘Attribute’ to add attributes for your products. Click on the ‘Attributes’ button and a new page will appear. Now click on the button called ‘Add attribute’ and instantly a pop-up box called ‘New attribute: your shop name’ will appear. Now write the attribute name in the box called ‘Attribute name’ and add the attribute values in the box called ‘Attribute values’. Then click on the “save” button. Now, your attribute is saved and will appear on the page. You can edit and delete the attribute by clicking on the ‘Edit’ and “Delete” button. You can add another attribute by clicking on the ‘Add attribute’ button. Thus, you can add as many attributes as you want for your products.
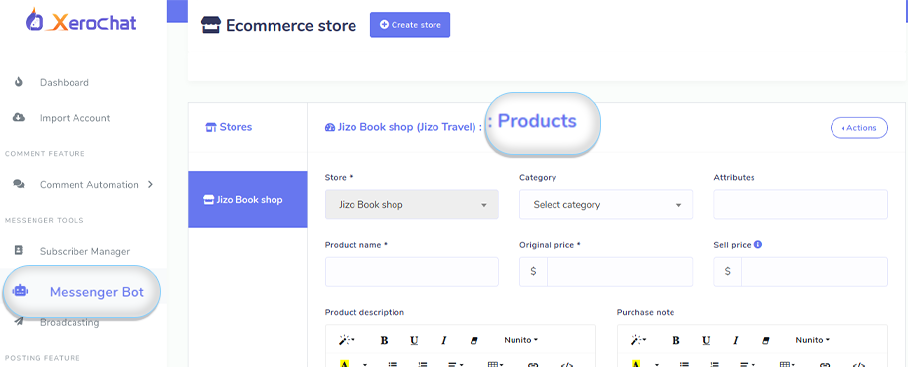
How to add products to your shop?
Once you have added categories and attributes for your products, you can add products to your shop. Click on the menu called ‘Products’ and your ‘Products’ page will appear. Now click on the button called ‘Add product’ and a form will pop up which you have to fill up with product details. You will see your shop name in the box called ‘Store’. If you have over one shop, you can select any shop from the store box, the shop to which you want to add products. Well, now you have to select a category from the categories, on the ‘Category’ box, you have added it to your shop. Then you have to select an attribute from the attributes, on the “Attribute box”, you have already added to your shop. Write the product name in the box called ‘Product name’. Then write the original price of the product in the box called “Original price”. Next to the box, you will see a box called “Sell price”–you can put an offer price if the product is on sale. Filling up the box, however, is not mandatory. Now you have to write a description of your product in a box called “Product description”. You can also write a purchase note in the box called ‘Purchase note’—it is optional. Now you have to upload the thumbnail image and the featured image of your product. Then you will see a box called ‘Item in stock’. In this box, you can provide the number of products you have in your stock. Then you will see four radio buttons called “Display stock”, “Prevent purchase if out of stock”, “Status and Taxable”. You can turn on and off these buttons as you wish. If you keep the “Display stock” button on, the clients can see the number of products you have in your stock. If you keep the “Prevent purchase button” on and the product is out of stock, the clients can’t buy the product. If you keep the ‘Status’ button off, the clients can’t see the product while they buy products from your shop. If you keep the ‘Taxable’ button to Yes, Tax will be added automatically to the price of the product. Now click on the ‘Save’ button and your product will be added without delay. You can add as many products as you want in the same way. You can also click on the ‘Cancel’ button to cancel adding the product to your shop.
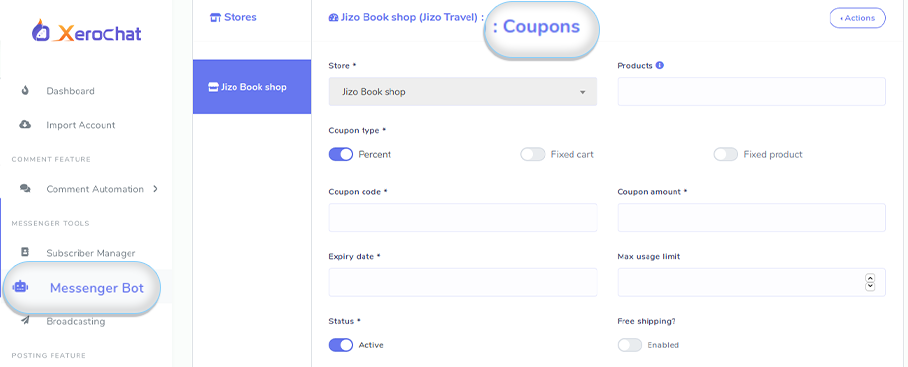
How to add coupons for your products?
You can add coupons for your products. To add a coupon, click on the coupon menu and a page will appear. Now click on the button called ‘Add coupon’ and a form will appear where you have to provide the coupon details. At first, you will see your store name. If you have already created over one store, you will see the name of every store here- you can select the desired store. Now select the product from the box called ‘Product’ to include it in the coupon. Now you will see three radio buttons called ‘Percent’, ‘Fixed cart, Fixed product’. You can only keep one of the buttons on. Then you have to fill up the boxes called ‘Coupon code’, ‘Coupon amount’, ‘Expiry date’, and ‘Max usage limit’. Now you will see two radio buttons called ‘Status’ and ‘Free shipping?’. If you want the coupon active, check the “Active” button. And if you want to enable free shipping for the coupon, check the ‘Free Shipping button’. The product will be shipped without any cost, then.
Now go to the ‘Copy URL’ menu to see different kinds of URL. In the ‘Copy URL’ page of your shop, you will see your url in four categories such as ‘Store url’, ‘Order url’, ‘Product url’, ‘Legal url’. You will need these urls to set your ‘E-commerce in messenger chatbot’.

How to set your E-commerce in messenger chatbot?
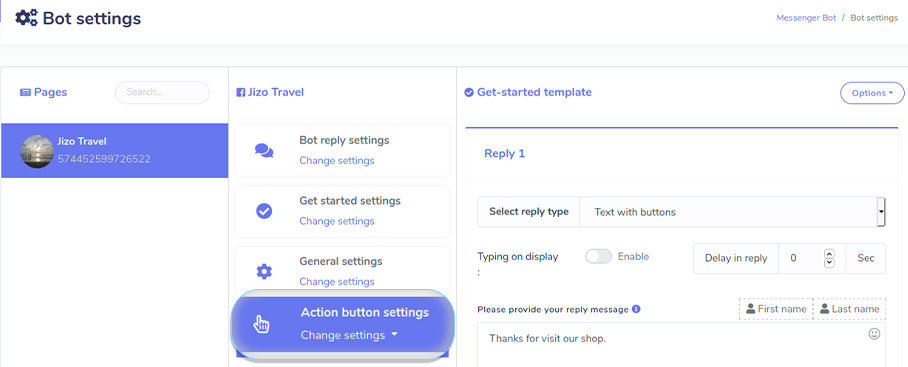
To set your E-commerce in messenger chatbot, first, you have to go to the ‘Messenger Bot’ page. In the beginning of the page, you will see the ‘Bot settings’ option. Now click on the ‘Action’ button below and ‘Bot settings’ interface will appear. On this interface, you have to set your e-commerce in messenger bot. First, click on the “change settings” button under the “Action button settings” and a drop-up menu will appear with 10 menus in it.
Click on the first menu called ‘Get-started template’ and “Get-started template” will appear on the right side. You will see a box called ‘Select reply type’. Now click on the right side of the box and a drop-up menu will appear. Select the ‘Text with button’ option. You can enable Typing on display by checking the radio button. You can also set the time in seconds in a box called “Delay in reply”. You can write a message to your clients that will be sent automatically after they knock the messenger bot. You can also insert the first name or last name of the clients in the message by clicking on “First name” and “Last name” above the box.
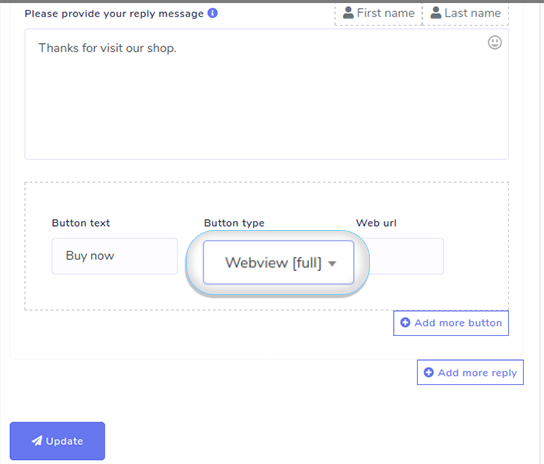
Under the message box, you will see three boxes called ‘Button text’, ‘Button type’. In the ‘Button text’, you have to write the name of the button- you can write ‘Buy now’. Then click on the ‘Button type’ box and a drop-down menu will appear with different buttons such as “Post back”, “Web url”, “Webview[compact]”, “Webview[tall]”, “User’s birthday”, “User’s email”, “Users phone”, “User’s location”, “Call us”, “Unsubscribe”, “Re-subscribe”, “Chat with human”, “Chat with robot”. You have to select from here what kind of button you want to use. If you select the “Post back” button, another box called “Postback id” will appear. And if you select “Web url” or any kind of webview button, a box will appear called “Web url”. You can select any kind of button.
In this article, we will create two kinds of buttons: “Postback” and “Webview[full]”.
How to create a “post back” button?
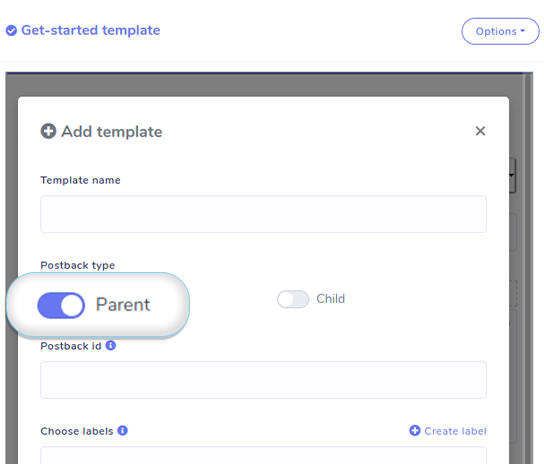
To create a “post back” button, select ‘Post back’ from the drop-down menu of the box called “Button type”. Now click on the small button called ‘Add’ under the box called “postback id” and a pop-up form called ‘Add template’ will appear. Now write the template name, for instance ‘trending products’, in the box called ‘Template name’. Then write your postback id, for instance ‘trending-products’, in the ‘Postback id’ box. Then select ‘Carousel’ from the ‘Select reply type’ box. You can enable “Typing on display” by checking the radio button. You can also set the time in seconds in a box called “Delay in reply”. You can write a message to your clients that will be sent automatically after they click on the post back button of the messenger bot. You can also insert the first name or last name of the clients in the message by clicking on “First name” and “Last name” above the box. Then, your client’s “First name” or “Last name” will be mentioned in the message.
Well, after you select the ‘Carousel’ template, there will appear a form of a Carousel template. You can upload your product image by clicking on the “Upload” button. Then comes a box called ‘Image click destination link(optional)’. You don’t have to provide any link here because it will be opened in a different url. Just keep it blank because in this article I will put it as a webview in the button. Then write the title of the carousel and then the sub-title of the carousel. Then you have to write the name of the button in the ‘Button text’ box. Now select ‘Webview(full)’ from the drop-down menu of ‘Button type’. If you want to add a url of your store, you have to select ‘Webview(full)’. Now copy a url of a product for which you are creating the ‘post back” button from the ‘Copy url’ page and paste on the “Web url” box. You can add more templates by clicking on the ‘Add more template’ button. In the same way, you can create many templates. Well, click on the submit button and your template will be created instantly. Now click on the ‘Close and refresh list’ button and you will get back to the ‘bot settings’ page.
How to create a webview[full] button?
To create a Webview[full] button, select Webview[full] from the drop-down menu on the box called “Button type” on the “Get started template” page and a box called ‘Web url’ will appear. Now copy your “store page url” from the ‘Copy url’ page’s ‘Store url’ category and paste the url in ‘Web url’ box. You can add more buttons like this by clicking on the ‘Add more button’. Well now click on the update button and your button will be created.
Now your chatbot is ready to sell your products via your Facebook page’s messenger.
If you follow the commands in the article, your story will be created, arranged and your “E-commerce in messenger chatbot” will be ready to sell your products.
Enjoy!

2 thoughts on “How to create virtual store on ChatPion’s “E-commerce in messenger” interface”