How to make QR Menu for Restaurant food order with ChatPion
Ecommerce store is a striking feature of ChatPion, the world’s best marketing software. With the feature, you can create a QR menu meaning digital menu for restaurant. And scanning QR code, your clients can access the QR menu, meaning the digital menu of your restaurant on their mobile screen inside messenger or on any browser.
To make a QR menu, digital menu, for your restaurant, first you have to create a virtual restaurant in the interface of an Ecommerce store in ChatPion system. And your virtual restaurant will provide two QR codes– one for Facebook messenger and other for browser.
In this blog, I will show you how to create a QR menu for restaurant food order.
First you have to create a virtual restaurant that will provide QR codes automatically. Let’s do that.
Create virtual restaurant:
To create a virtual restaurant, go to the left panel of the ChatPion Dashboard > click on the Ecommerce store.
 After clicking on the ‘Ecommerce store’ button, the interface of the Ecommerce store will appear with a ‘Create store’ button at the top of the page.

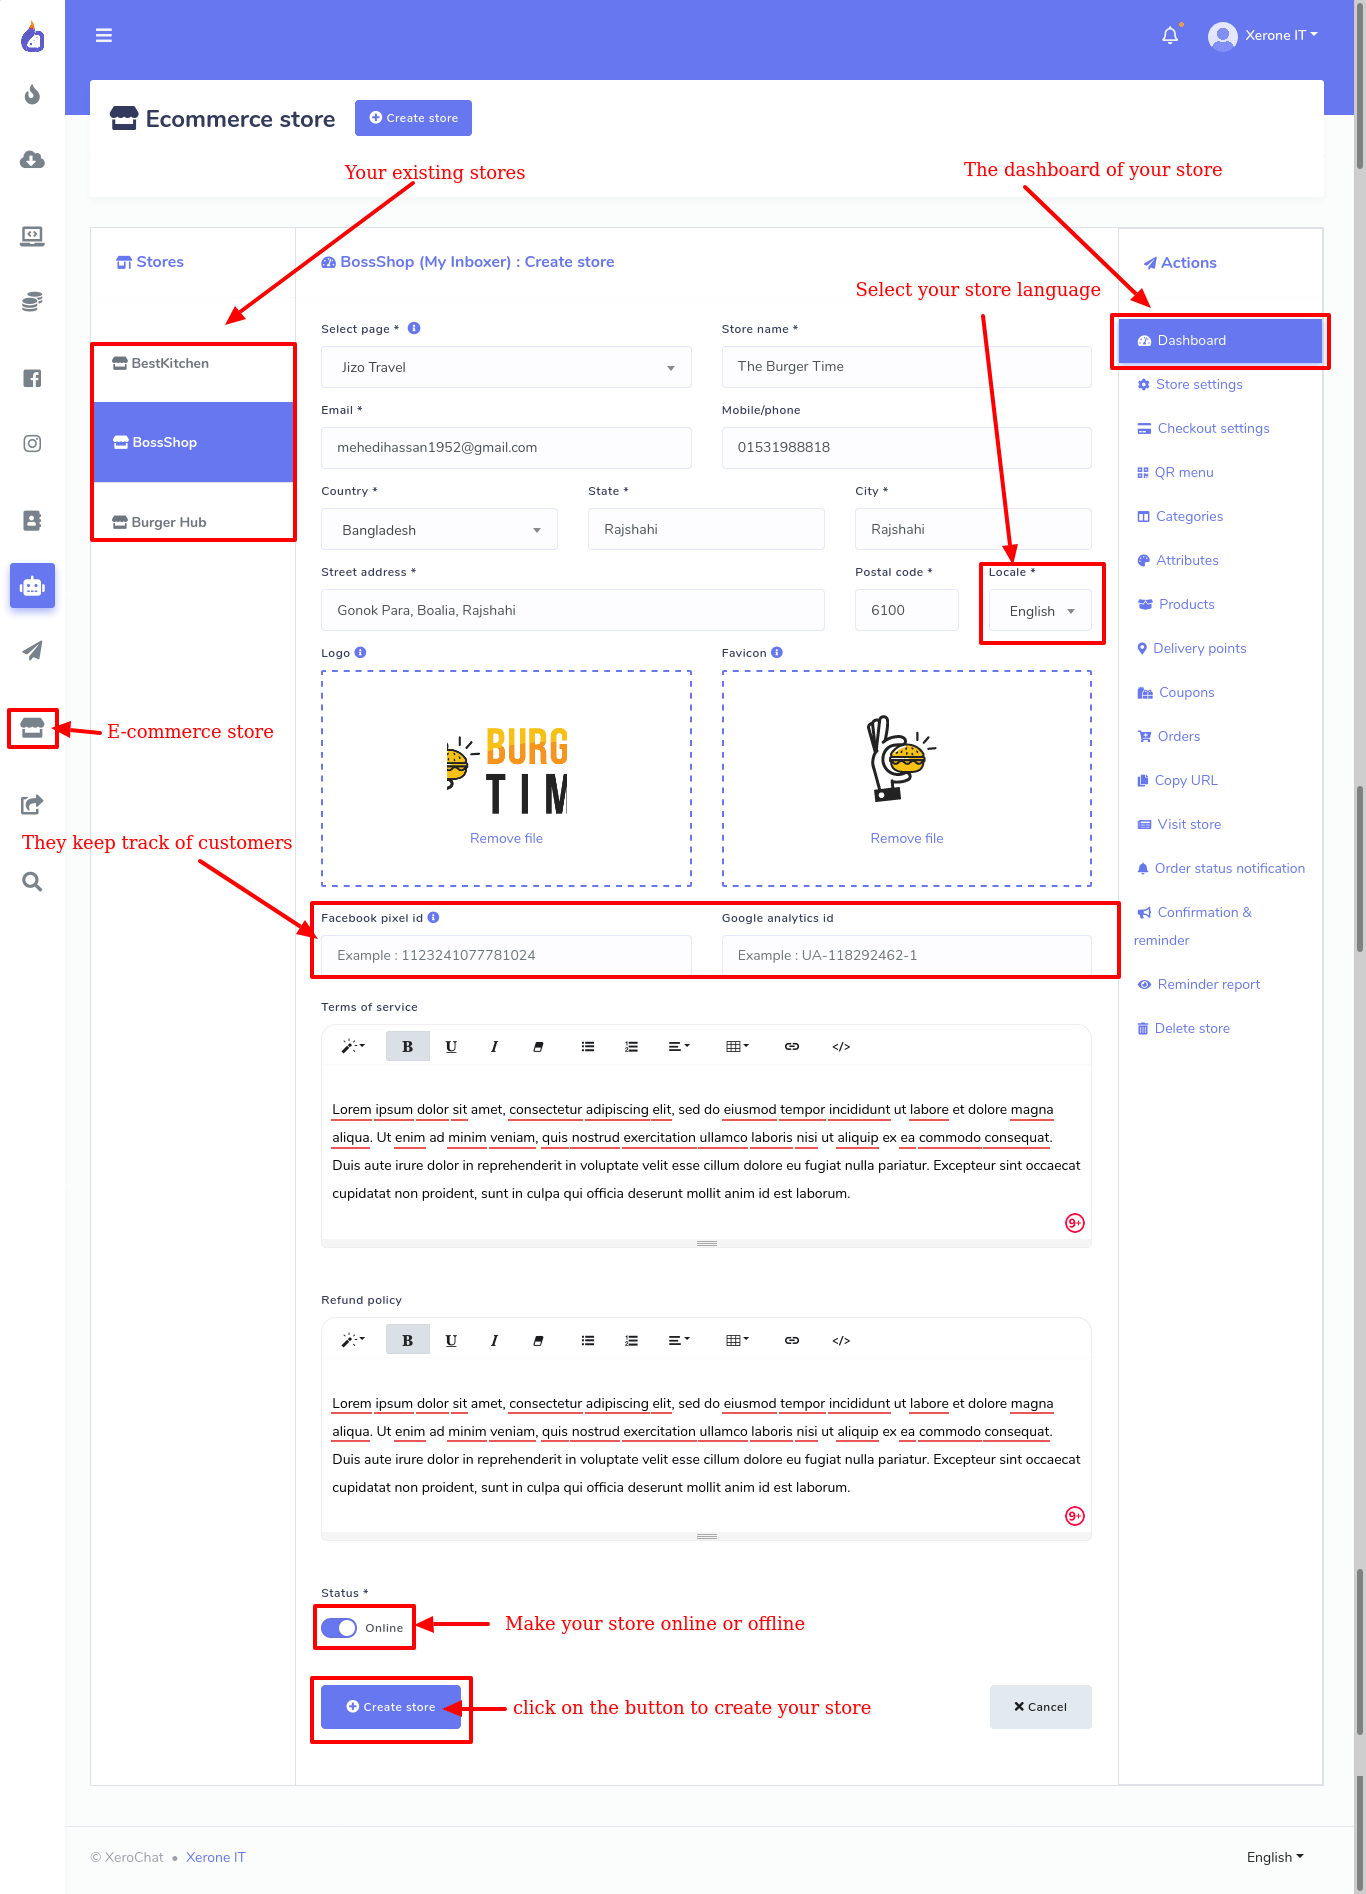
Click on the ‘Create store’ button and instantly, a form will appear and fill-up the form.
You can easily fill-up every field of the form except a field called ‘local’. Before fill-up the form, you need to understand what local means. Local is the language of your shop, meaning in which language your shop will open to your customers. Just as you click on the ‘local’ fields, a drop-down menu of different languages will appear. Now select your preferred language.
After filling up the form, click on the create store button. Instantly, pop-up box will appear with a successful message.
Add category:
Now you need to add some categories to organize the different food items of your restaurant.
To add category, go to the ‘Action menu’ at the right side of the Dashboard > click on the ‘Categories’ option> click on the ‘Add category’ button.
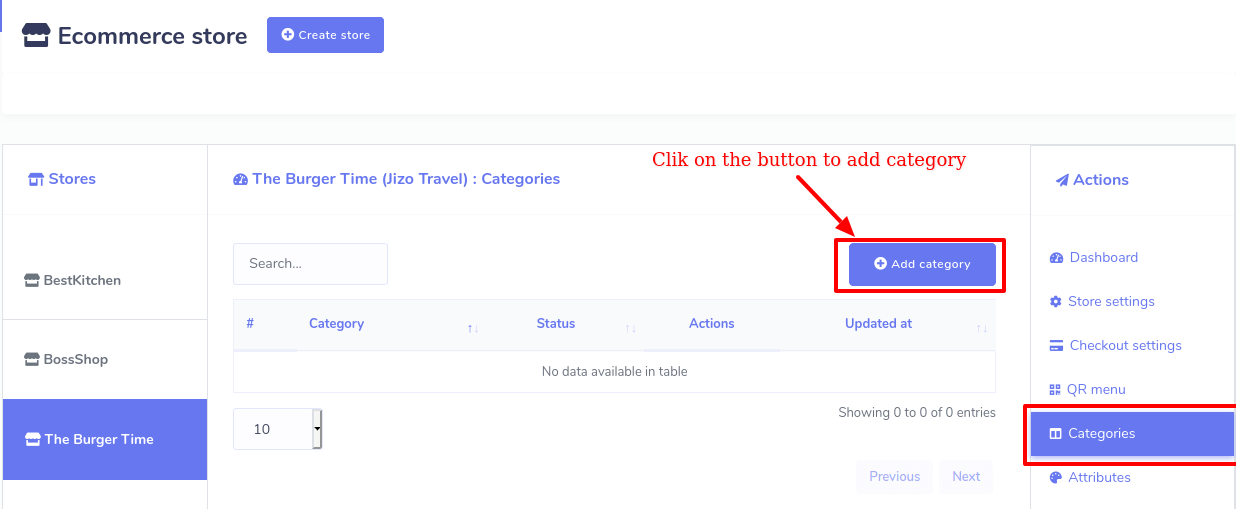
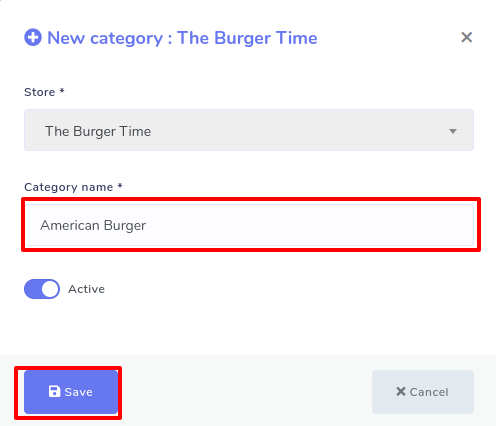
After clicking on the ‘Add category’ button, a pop-up form will appear.
Now write down the category name > Click on the ‘Save’ button.
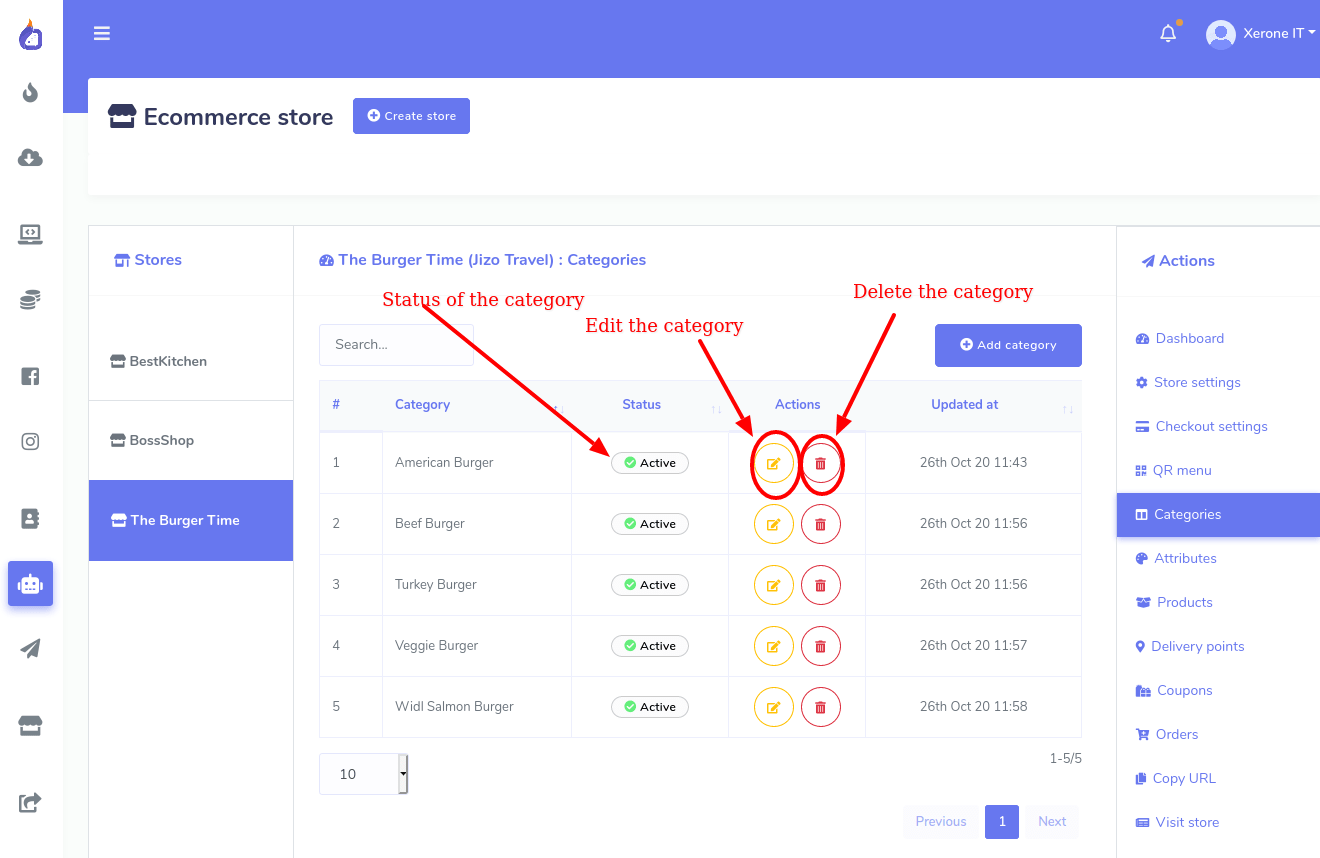
You can add as many categories which will be listed on the page with edit, delete and status button.
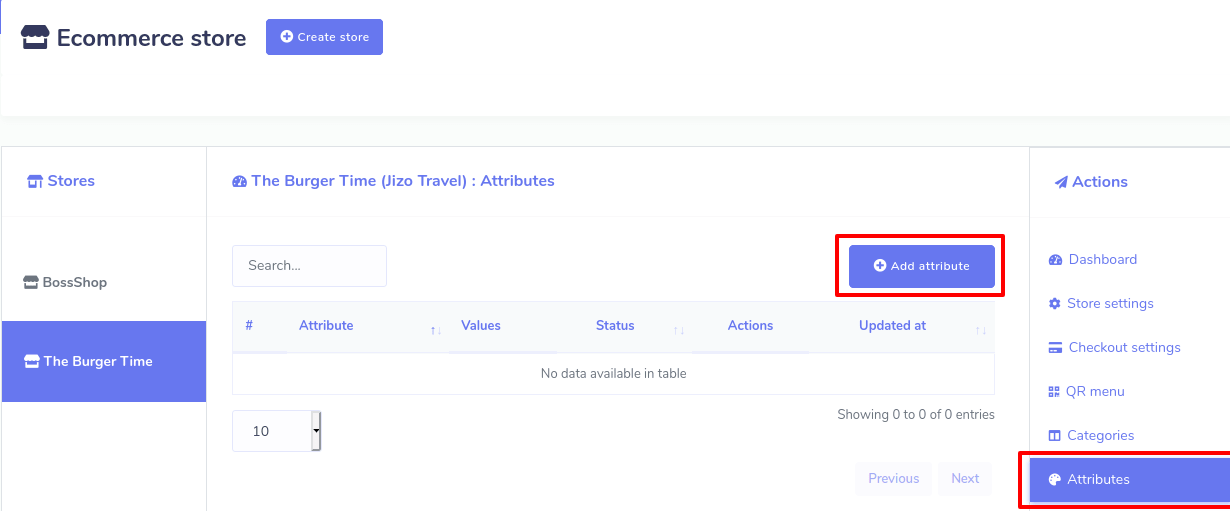
Add Attribute:
To add the attribute, click on Attributes > Add Attribute .
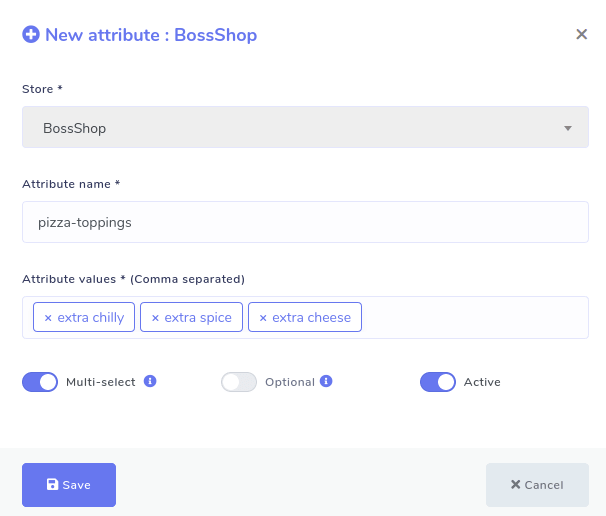
Now write down Attribute Name > provide Attribute Value > Enable or Disable three radio buttons called ‘Multi select’, ‘Optional’ and ‘Active’ as you see fit > click on Save button.
By disabling the ‘Active’ button, you can deactivate the attribute. And click on the tooltips of the other two buttons – Multi select and optional- to see the functionality of them.
In case, you don’t understand the functionality of the two buttons, let’s explain them more.
If you enable the ‘Multi-select’ button, your clients can select the multiple attribute values of the same food item. For example, If you add an attribute called ‘Pizza toppings’ and add three values like ‘Extra Chilly’, ‘Extra spice’ and ‘Extra cheese’ and turn on a multi-select button, your customers can order a Pizza that has Extra Chilly, Extra spice, and Extra cheese at the same time.
On the other hand, if you disable the ‘Multi-select’ button, your clients can only select one attribute value for a specific food item. For example, if you disable ‘Multi-select’ for an attribute called ‘pizza toppings’ with three values called ‘Extra Chilly’, ‘Extra spice’, and ‘Extra cheese’ the clients can only order a pizza either with extra Chilly, extra spice or extra cheese.
As for the multi-select button, you are not allowed to enable the multi-select button for ‘Size’ attribute, because a food item can’t be of different sizes at the same time.
But you can enable the multi-select button for toppings attributes because toppings can have different attribute values at the same time. For example, pizza toppings can have Extra Chilly, Extra Spice, and Extra Cheese at the same time. Therefore, for pizza toppings attributes, enabling the multi-select button is required because customers can give orders for a pizza that has extra Chilly, extra spice, and extra cheese.
On the contrary, if you enable the optional button, your clients can order for the food without selecting any attributes. In this case, the client will get the products of the default value.
But if you disable the ‘Optional’ button, the clients are not allowed to order the food item without selecting any attribute.
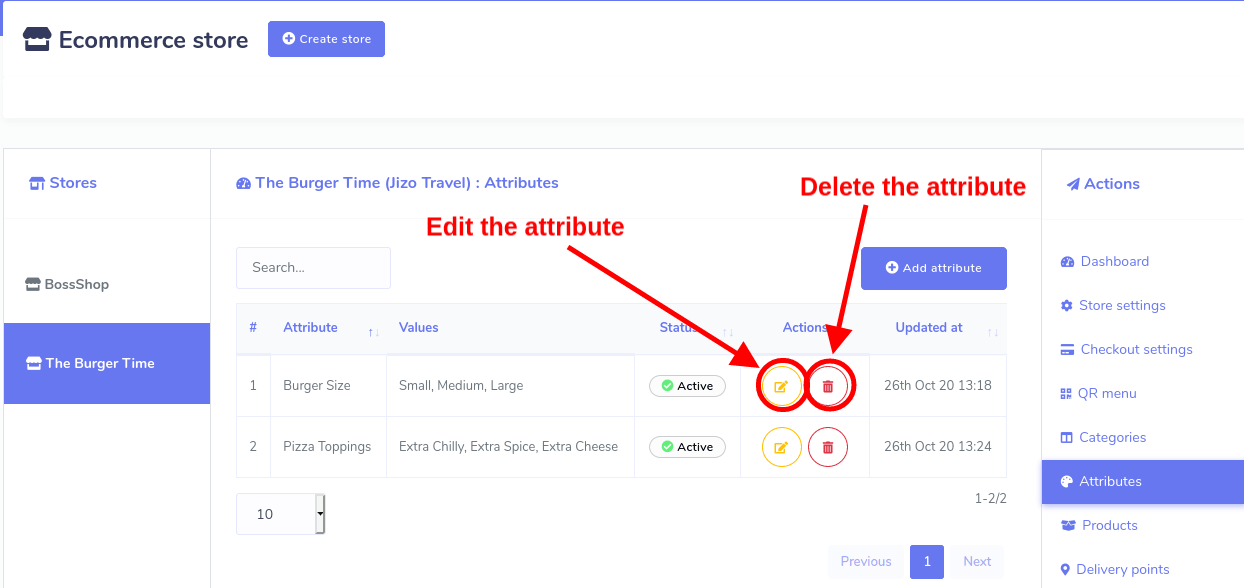
Like the Category option, you can add as many attributes as you need. And the attributes will be listed on the page. And form the page, you can edit, delete and check the status of the attribute.
Add food items to the store:
You have already added categories and attributes, so add some food items.
To add food items, click on the Products option at the right panel of the dashboard.
Now a page will appear with a ‘Add product’ button at the top of the page.
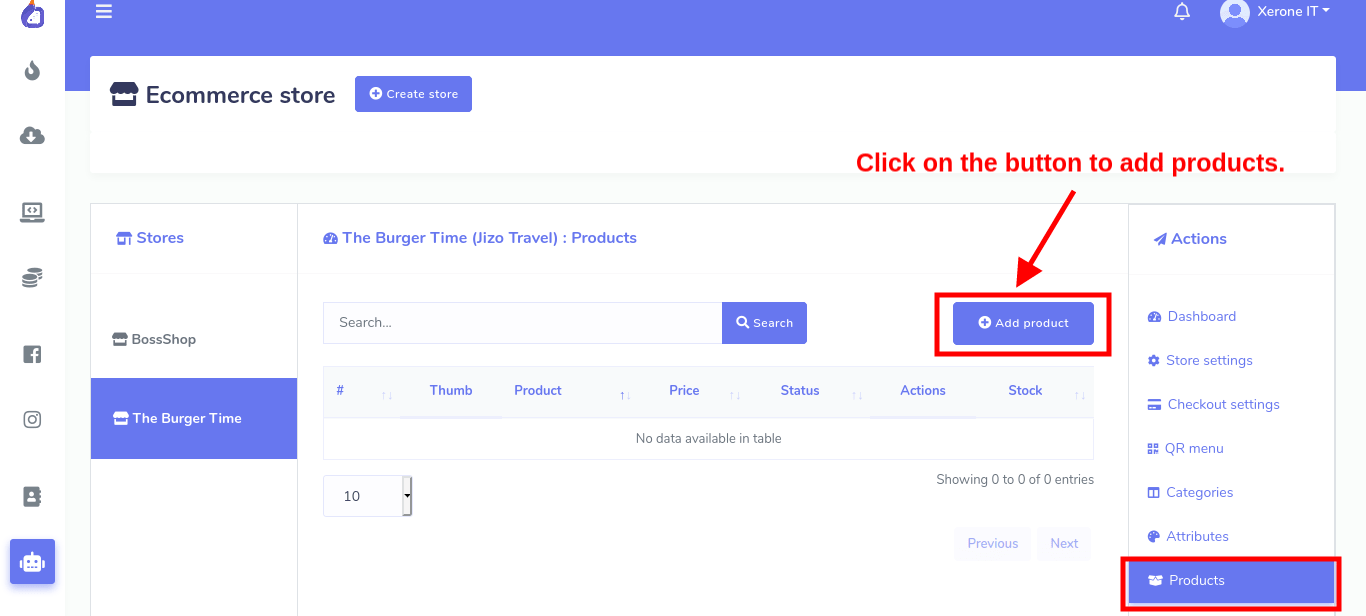
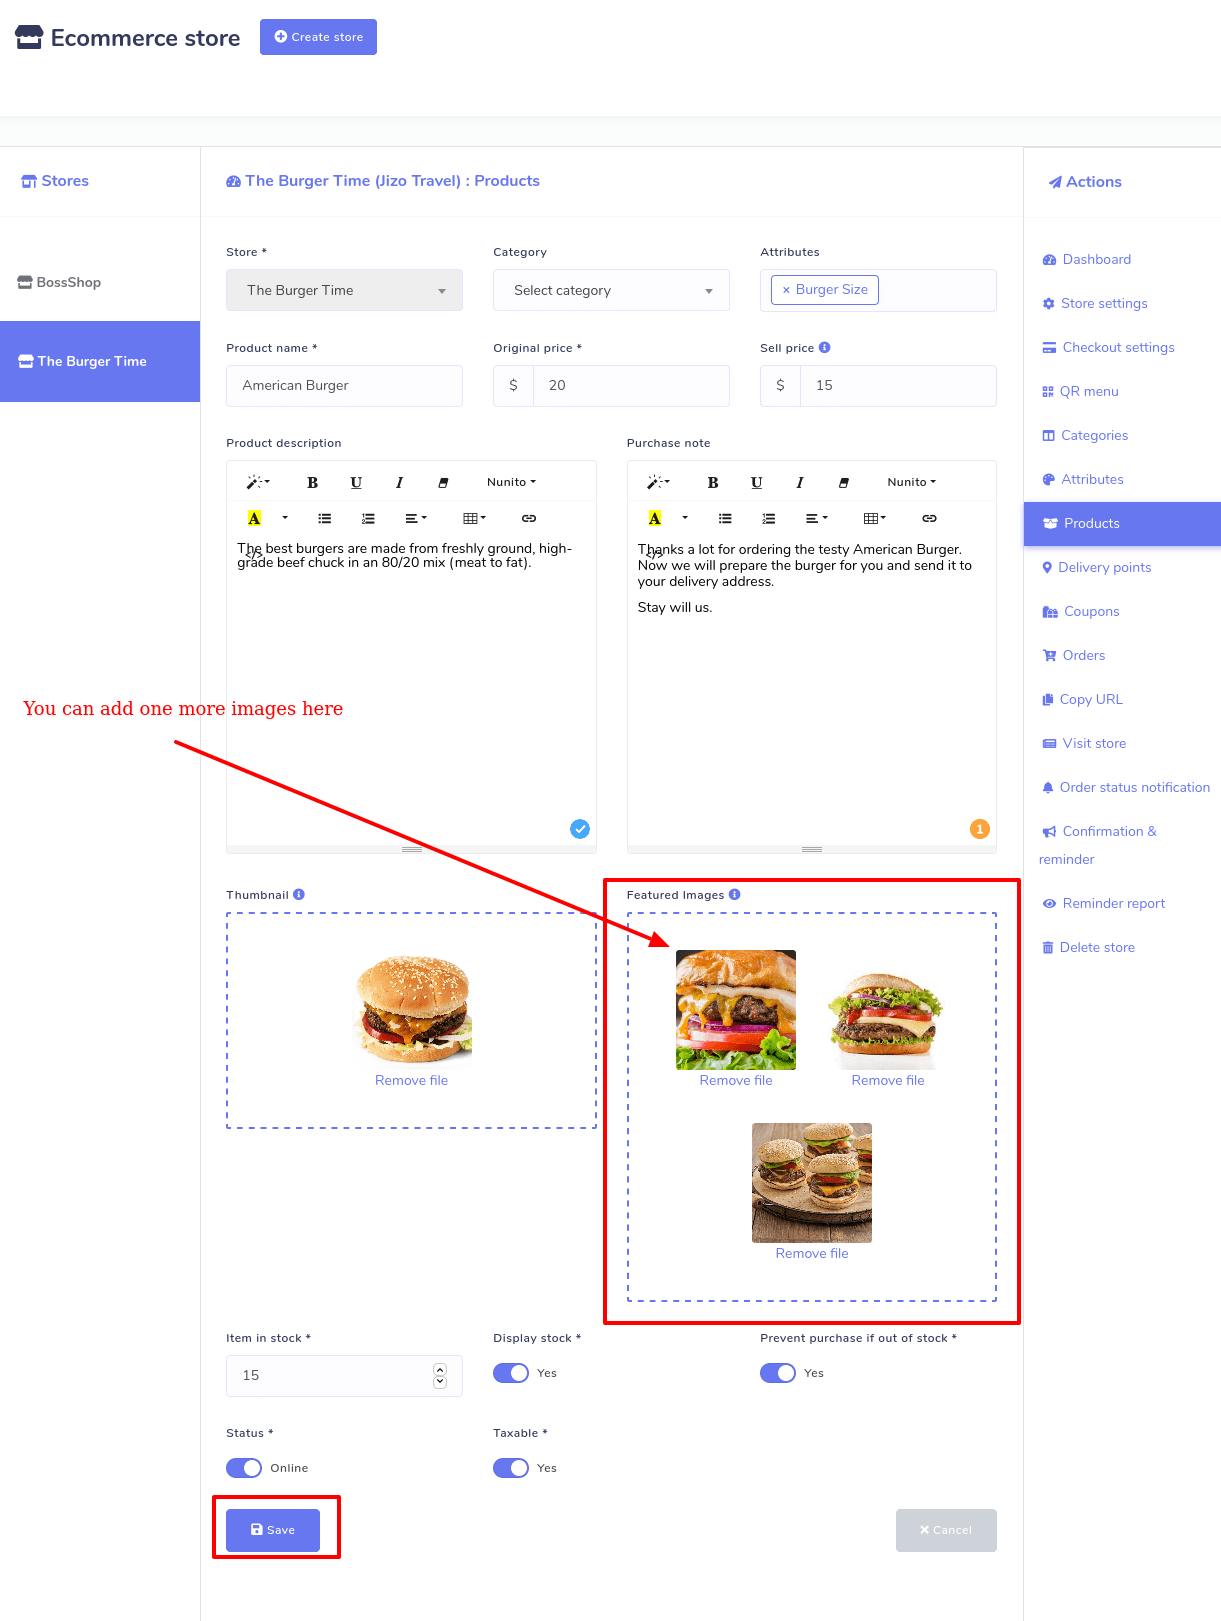
Now click on Add product and a form will appear > Fill up the form > click Save button.
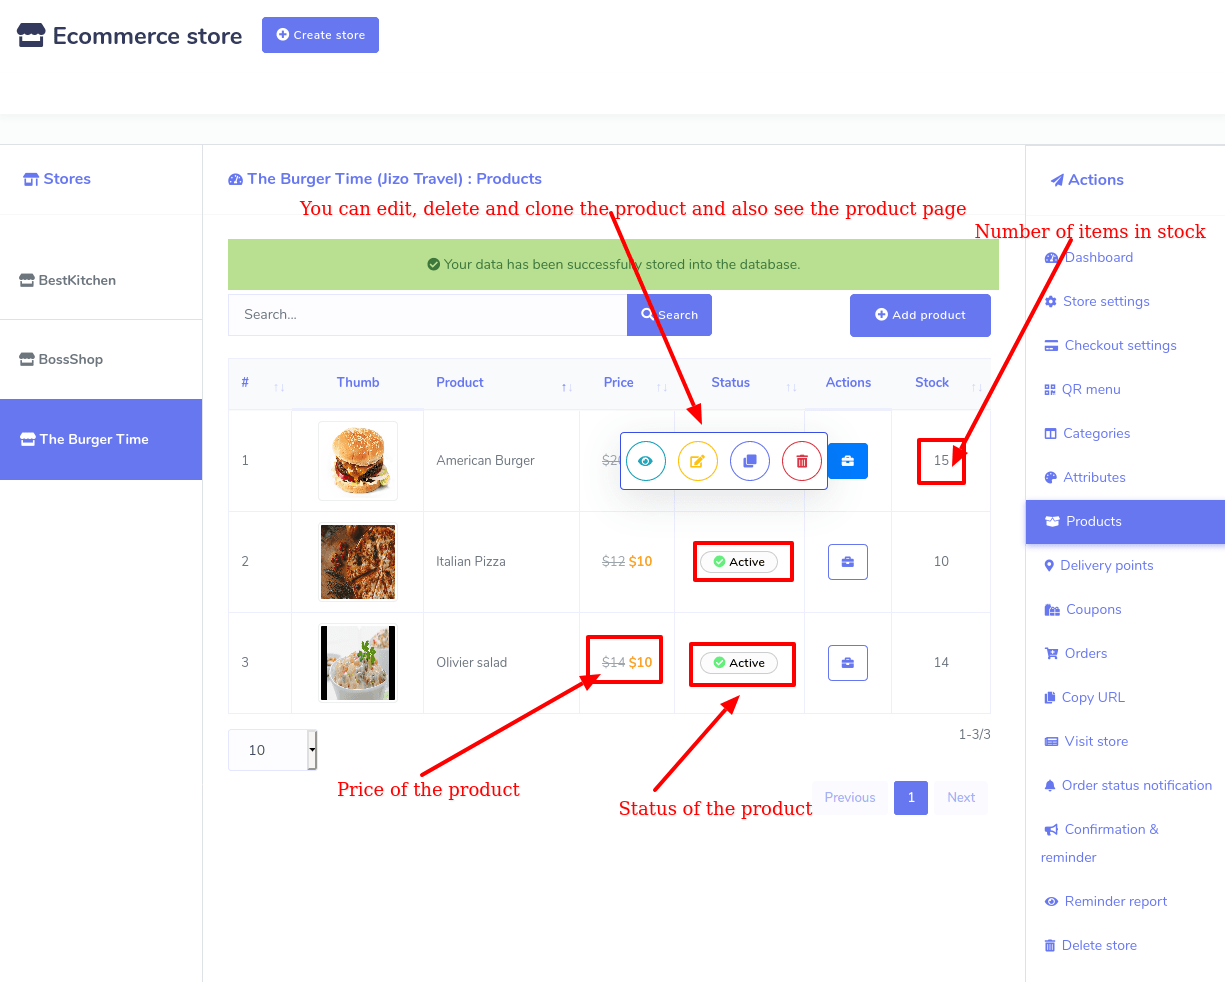
You can add as many food items as you want. Like Category and Attribute, all the food items listed will be shown on the product page.
You can see the price and status of the food items. And click on the Action button of a specific food items a pop-over menu with will appear with Delete, clone, edit and product page(Eye Icon) will appear.
Checkout settings:
Now make a checkout setting for your virtual restaurant. ChatPion’s ‘Ecommerce store’ has added some online payment methods– PayPal, Stripe, Mollie, Razorpay, Paystack– so that your customers can pay via the payment methods easily. Besides, a customer can pay via manual payment. It also has a cash on delivery option.
You can make a different checkout setting for a different store.To make a checkout setting, click on the ‘Checkout settings’ > fill up the form > click on save button.
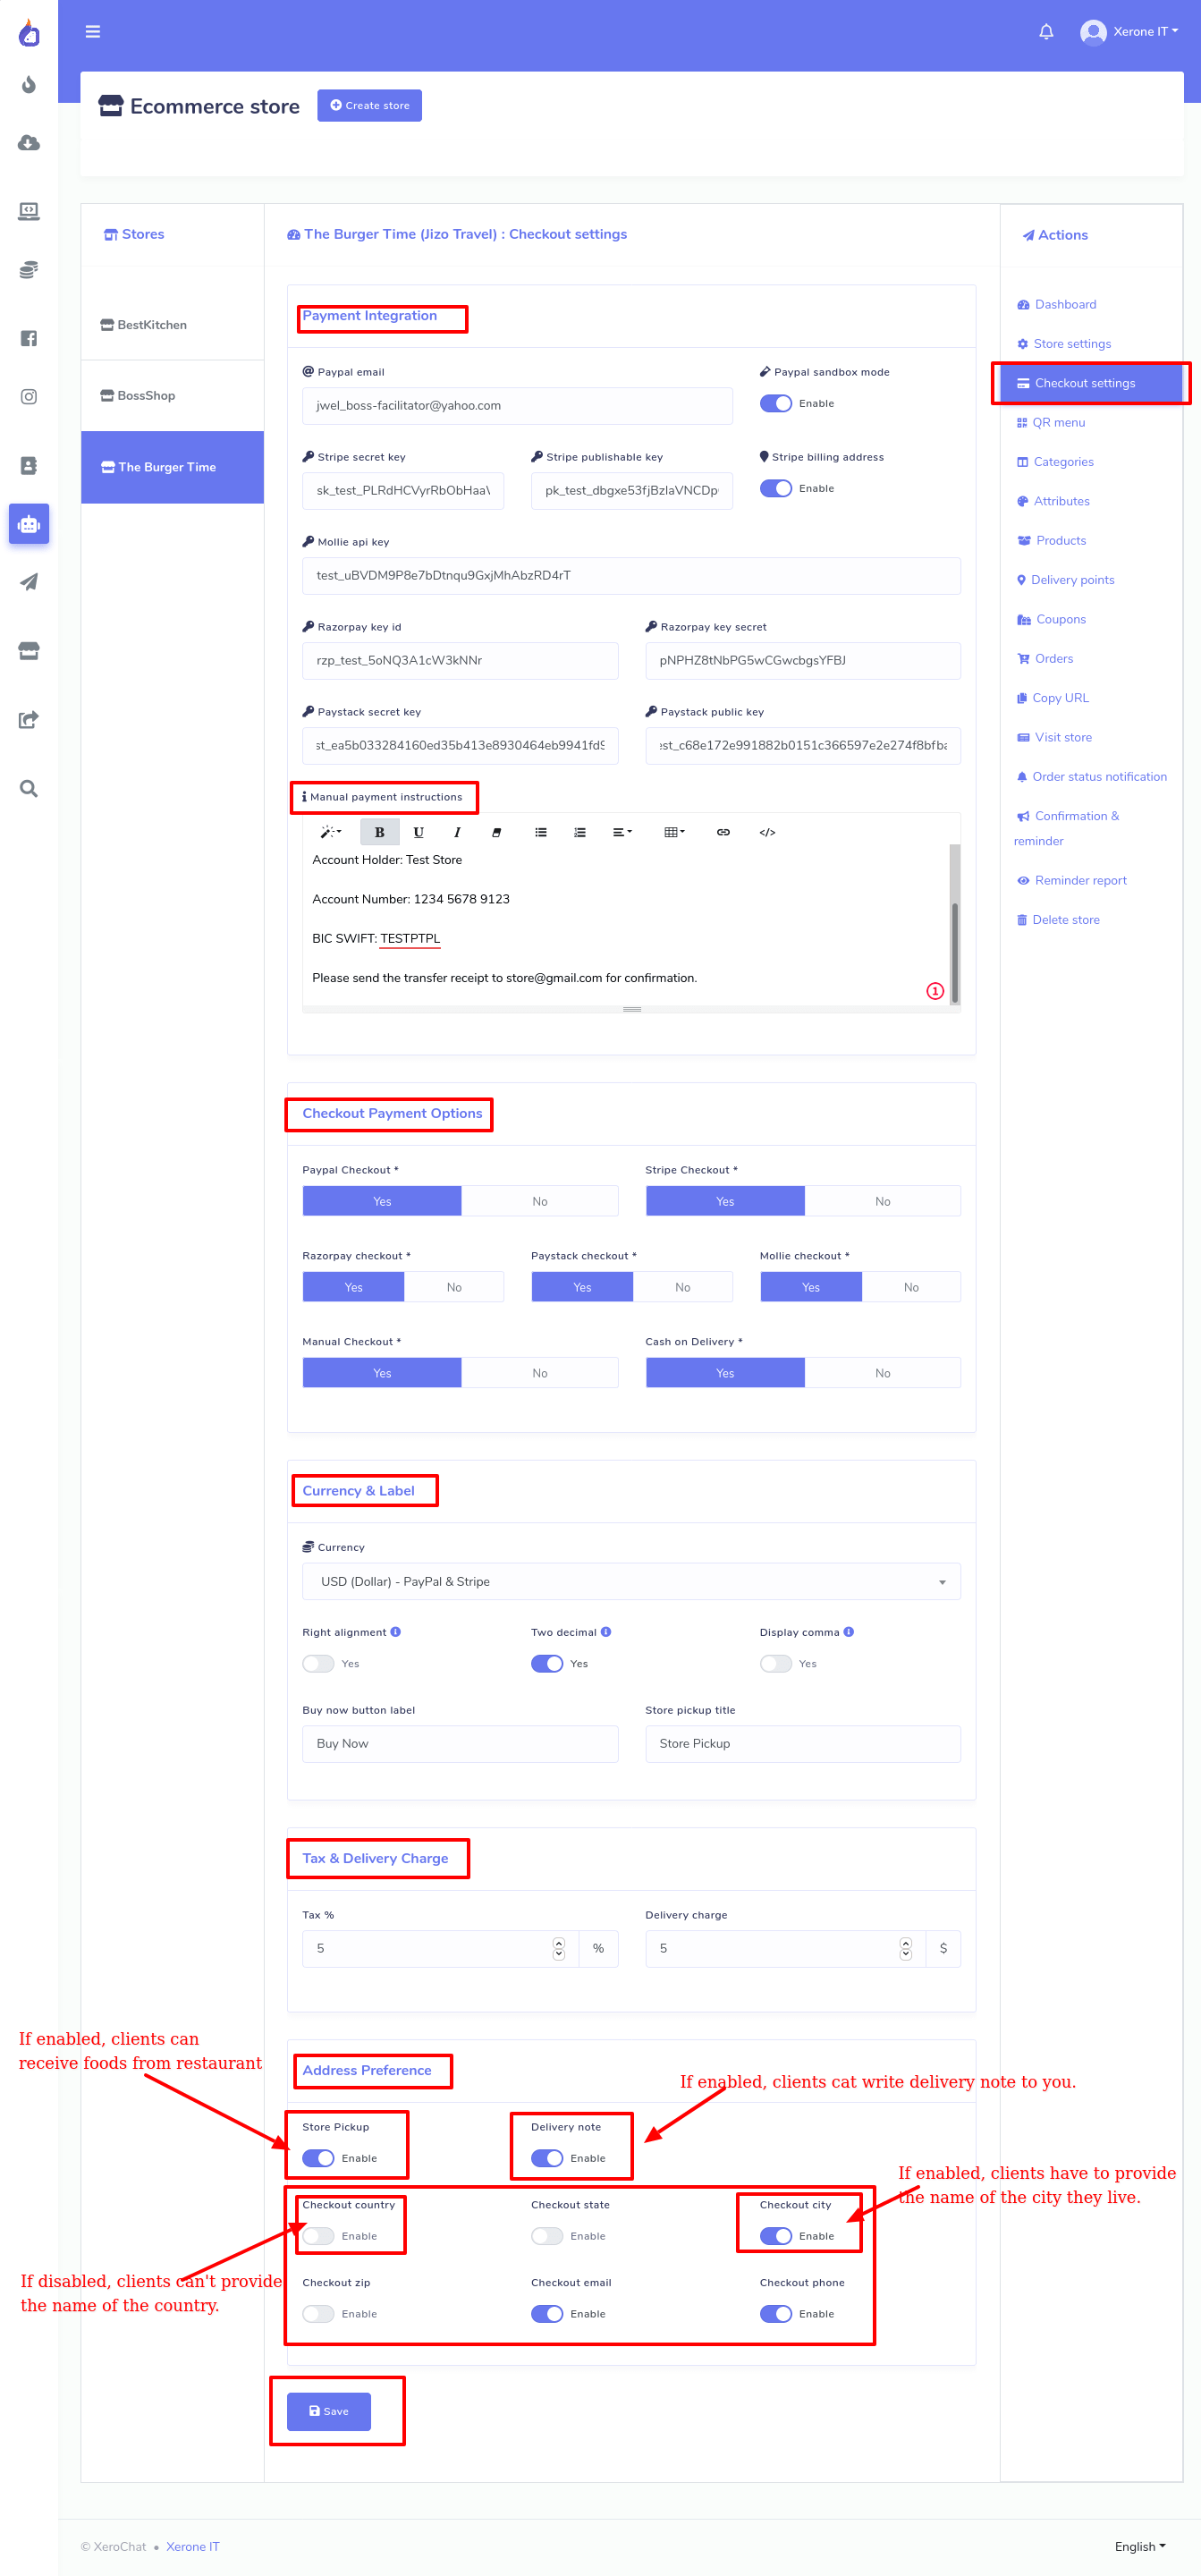
To fill up the form, first, you have to provide your account information of different online payment method. Then give the instruction for manual payment in ‘Manual Payment Instruction’ field.
After that, you will get a checkout payment option. From here, you can enable any online payment methods and manual checkout for your store. ‘Cash on Delivery’ is already enabled by default.
Then you will see the ‘Currency and Label’ option– select the currency of online payment methods. For instance, if you select USD(Dollar) for PayPal and Stripe, your clients have to pay in Dollars via PayPal and Stripe. Now you will see, in a row, three radio buttons ‘Right alignment’, ‘Two decimal’, and ‘Display comma’. Please hover your cursor on the tooltips, and the functionalities of the buttons will be displayed. True, you can change the labels for the ‘Buy Now’ button and ‘Store Pickup’ title.
Now provide the amount of Tax in percentage and delivery charge in the respective fields.
In the address preference area, if you enable the ‘ Store Pickup’ button, your clients can receive food on the table in your restaurant. Of course, you have to enable it if you want the proper use of a digital menu in your restaurant.
On the contrary, if you disable the ‘Store Pickup’ button, the clients can’t receive food in the restaurant. In this case, the clients can only receive food outside of the restaurant.
By enabling the ‘Delivery note’ button, you can enable your customers to write ‘Delivery note’ on how the client wants the delivery.
Then you can determine which piece of information your clients have to provide in their delivery address. The matter is pretty important. If you have customers from a specific area, you needn’t to bother them by providing the piece of information – like county, city and country zip.
Now click on the save button and your checkout setting is set.
Delivery points:
To provide digital, you must enable the store pickup option. Now you have to set the delivery points so that your customers can easily provide their exact location in your restaurant where the food will be delivered. So add delivery points name and delivery point details.
Since it is a restaurant, delivery points would be table and point detail would be table number.
To add a delivery point, click on the ‘Delivery points’ > ‘Add point’ button fill up the pop-up form by providing point(Table) and point details (For example, Table 1). > click save button.
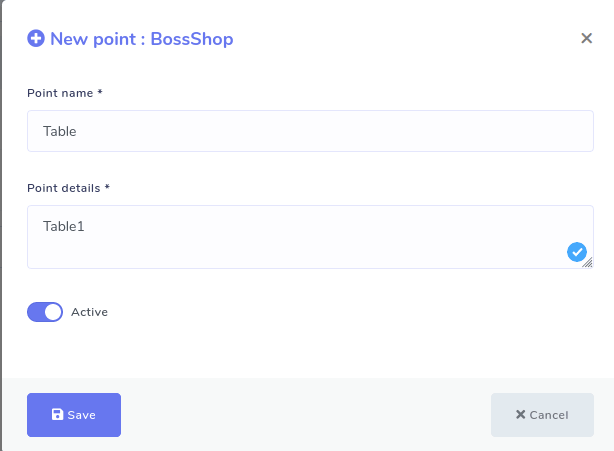
You can make as many delivery points as you want. And all the delivery points will be listed on the page. From the page, you can edit and delete any delivery point.
Coupon:
To give discounts on some specific products, you have to provide coupon codes. So you have to make a coupon.
To make coupons, click on the ‘Coupons > Add coupon > fill-out a form.
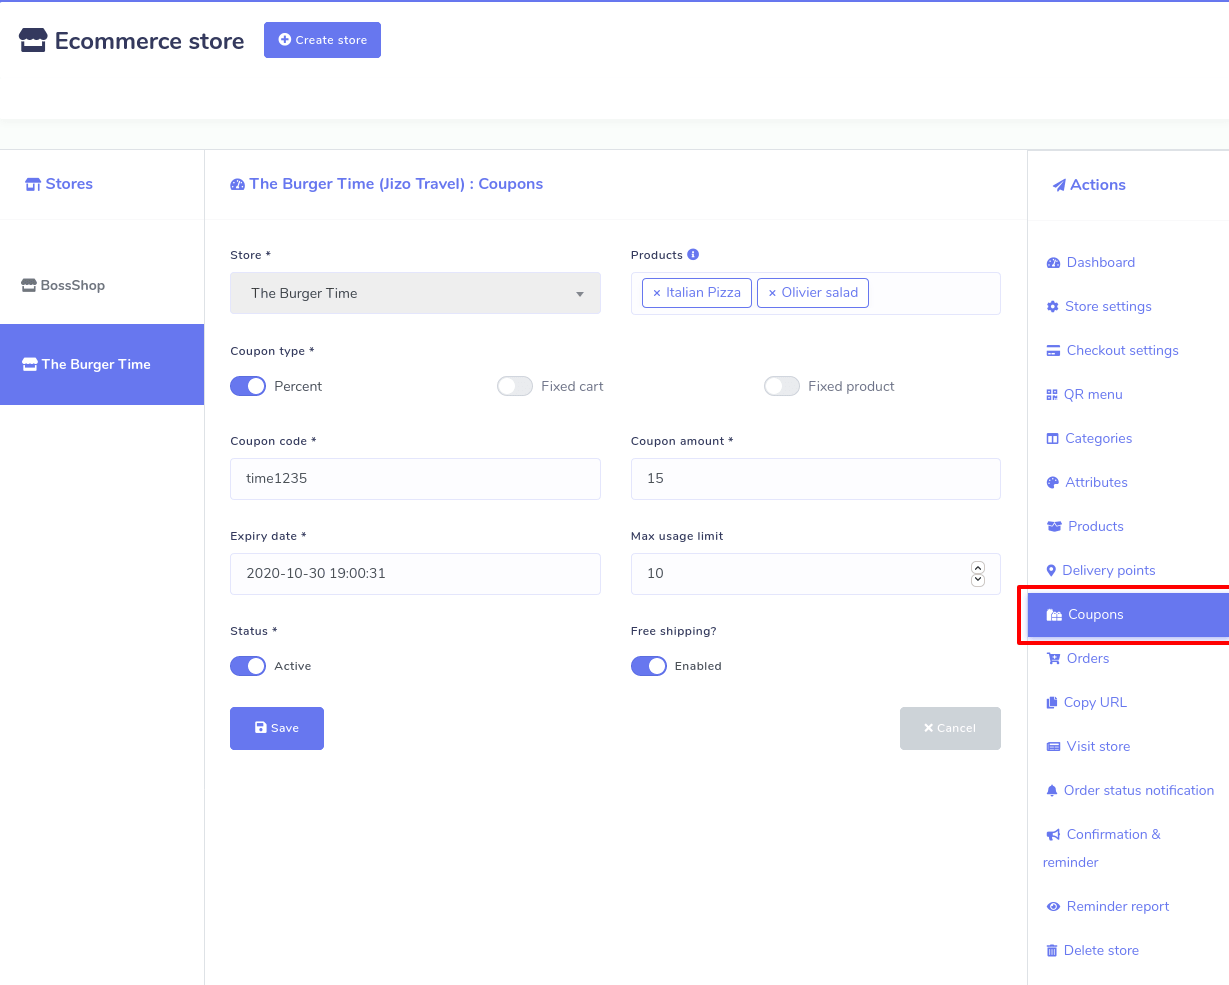
How to fill-out a form:
At the products field, you can add products the coupon will be applicable on. But if you don’t select any products, the coupon will apply on all the products of your store.
Then you will see three radio buttons, in coupon type options. That is, you can make three types of coupon Percent, Fixed cart, and fixed products. Before selecting what kinds of coupon you want to make, you have to understand the difference among the coupon types:
Let’s explain:
Percent– Percent coupon type is applicable for selected products only. For example, if the cart contains three (3) t-shirts @ $20 each = $60, a coupon for 10% off applies a discount of $6.
Fixed cart –A fixed total discount for the entire cart. For example, if the cart contains three (3) t-shirts @ $20 each = $60, a coupon for $10 off gives a discount of $10. This coupon type will be applicable for all the products you have added to cart whether you have selected the products or not.
Fixed product – A fixed total discount for selected products only. Customers receive a set amount of discount per item. For example, three (3) t-shirts @ $20 each with a coupon for $10 off applies a discount of $30.
Then you have to fill out the following boxes:
Coupon Code- Now give code for the coupon. Your customers will use the code to get discounts on the products the coupon is applicable to.
Coupon amount- Then you have to provide the amount for the coupon. Depending on the discount type you choose, the coupon amount will be a Fixed value or percentage. Enter the amount without a currency unit or a percent sign, which will be added automatically based on the discount type you choose e.g., Enter ’10’ for £10 or 10%.
Coupon expiry date– Date the coupon should expire and can no longer be used.
Max usage limit- You have to specify the number of times the coupon could be used before reaching the expiration date.
Coupon deactivate- By disabling the status button, you deactivate the coupon anytime.
Free shipping – If you enable Free shipping, the shipping cost will be removed when the coupon is used.
Orders:
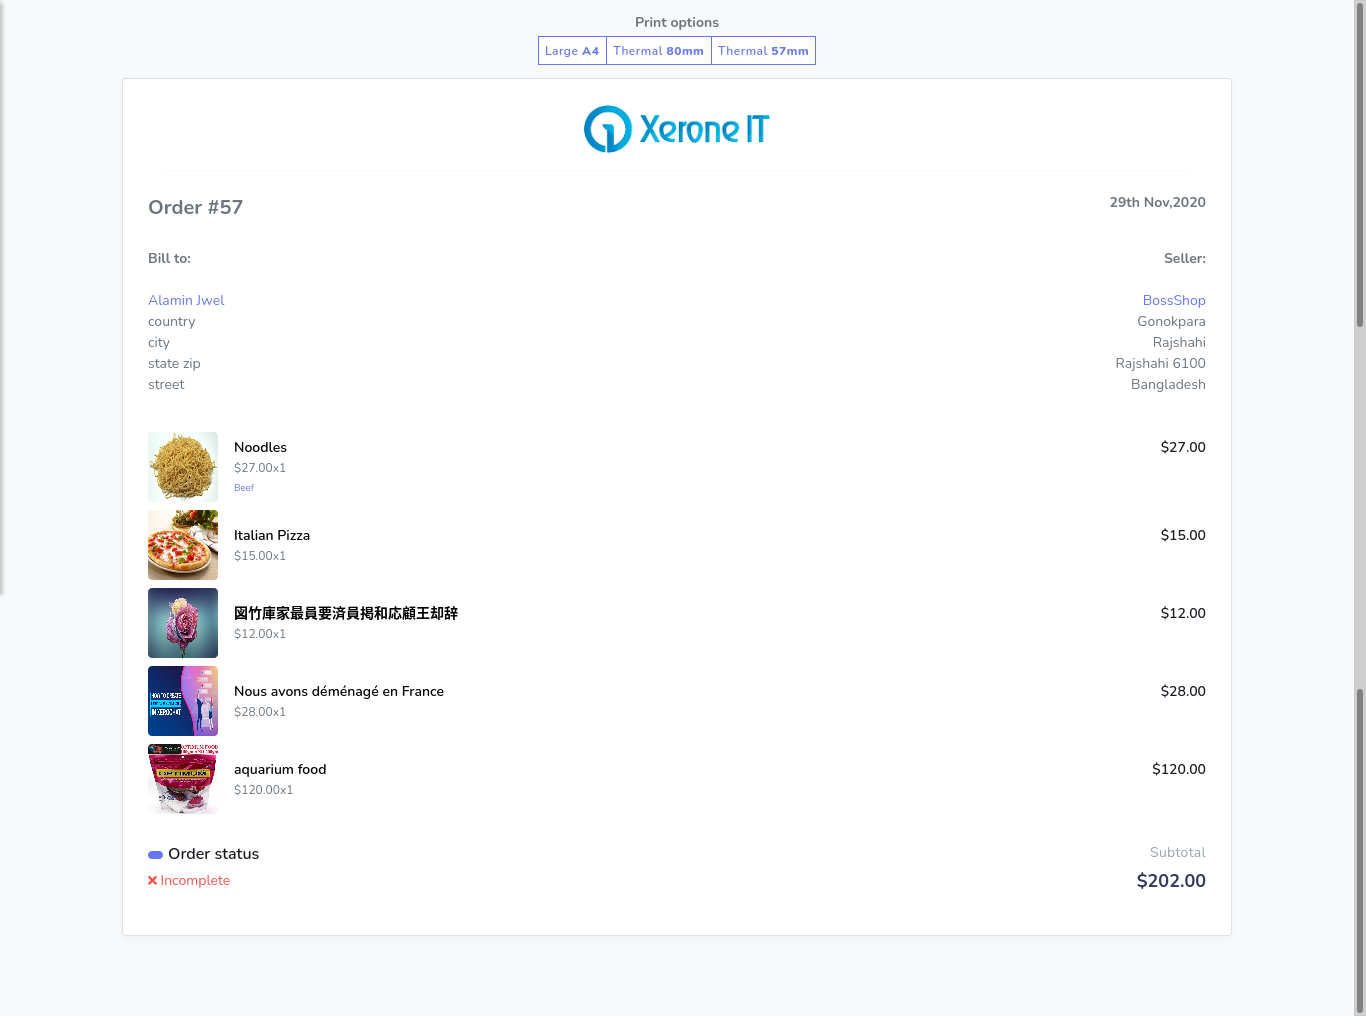
You can see the details of the orders from your clients on the ‘Orders’ page. And with a thermal printer, you can print the invoices for the orders.
To see the details of orders and print the invoices, click ‘Orders’. Instantly, a page will appear with all the orders listed.
And you can change the status of the orders. Click on the ‘Status’ field beside the specific order and a drop-down menu with ‘Pending’, ‘Approved’, ‘Rejected’, ‘Shipped’, ‘Delivered’, and ‘Completed’ will appear. Now you can select one of them according to the real status of the order.
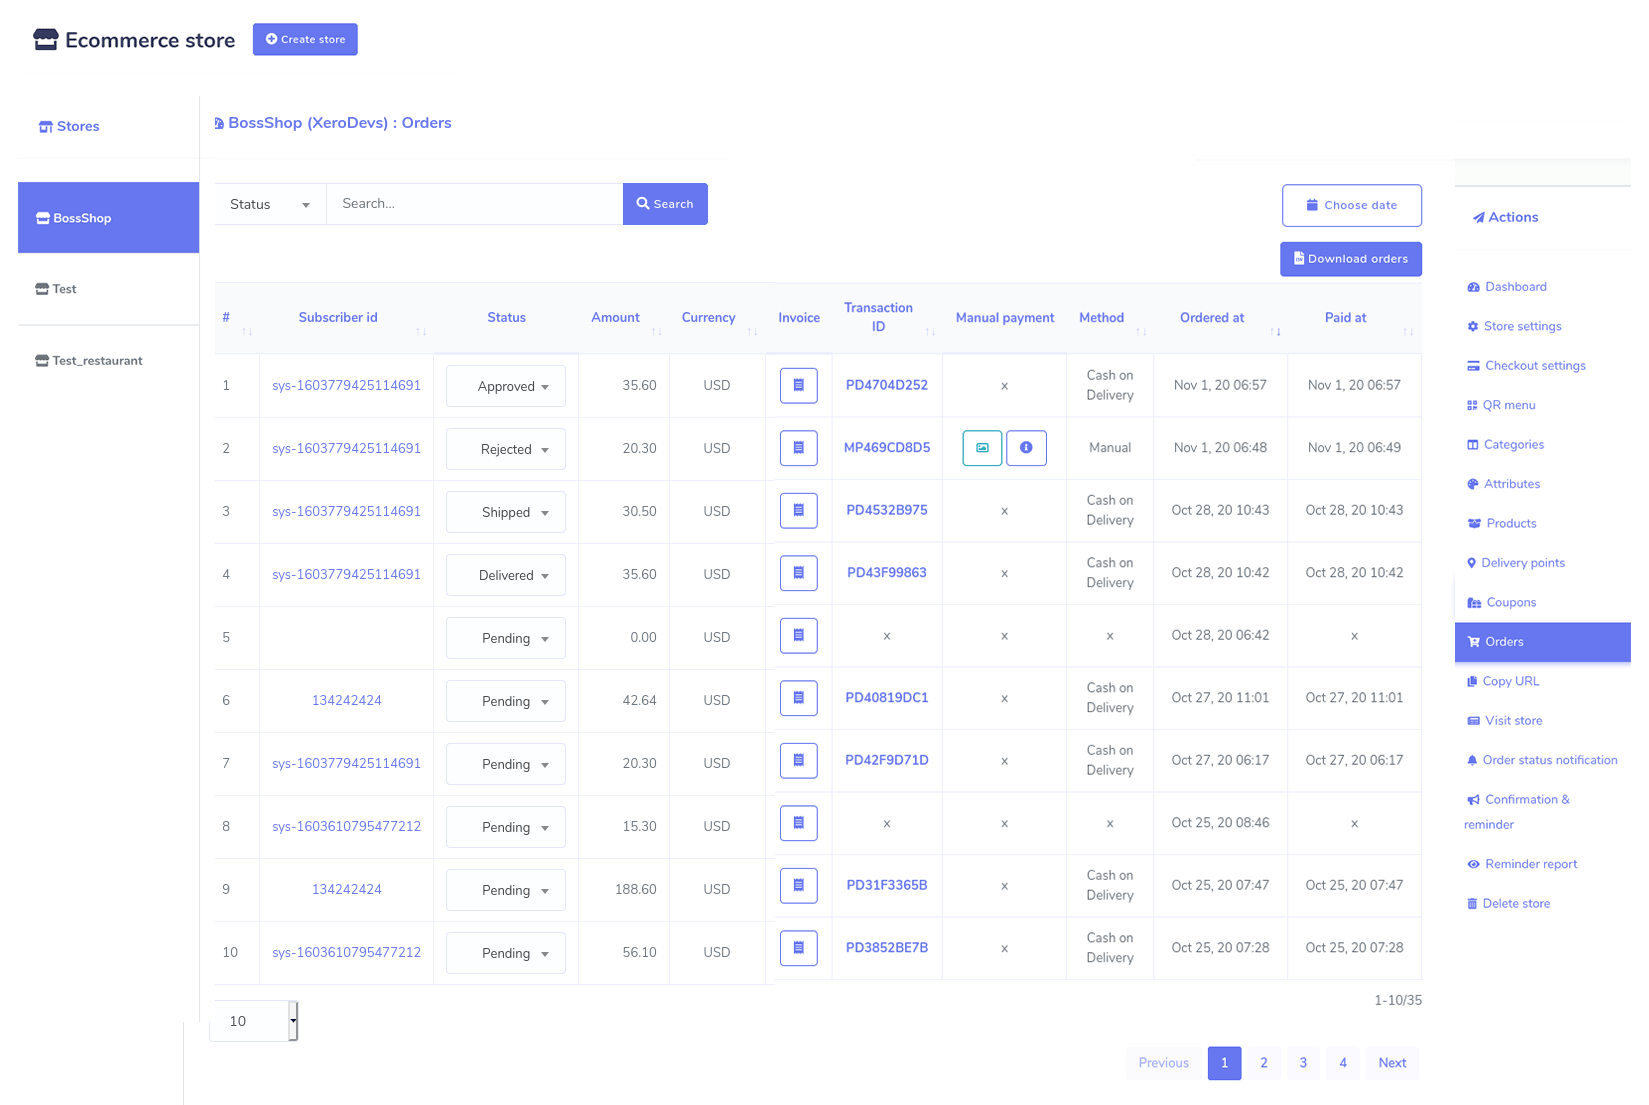
To print out the invoice, click on the invoice button and you will see the invoice
ready to be printed. Now click on the print button at the top of the page. Then you can give the printed copy of the orders to the cook so that he can prepare the food item that has been ordered.
Clicking on the ‘Choose date’ button, you can check the orders of a specific time such as the last month. Now click on the ‘Download orders’ button to download the list of orders in a CSV file.
Abandoned cart recovery reminder:
If you make a setting, the digital menu can send abandoned cart recovery reminders to the clients if they leave the digital menu after added food item to the cart.
To make a setting for the abandoned cart recovery reminder, click on the ‘Confirmation and Reminder’ > fill-out a form > click on the save button.
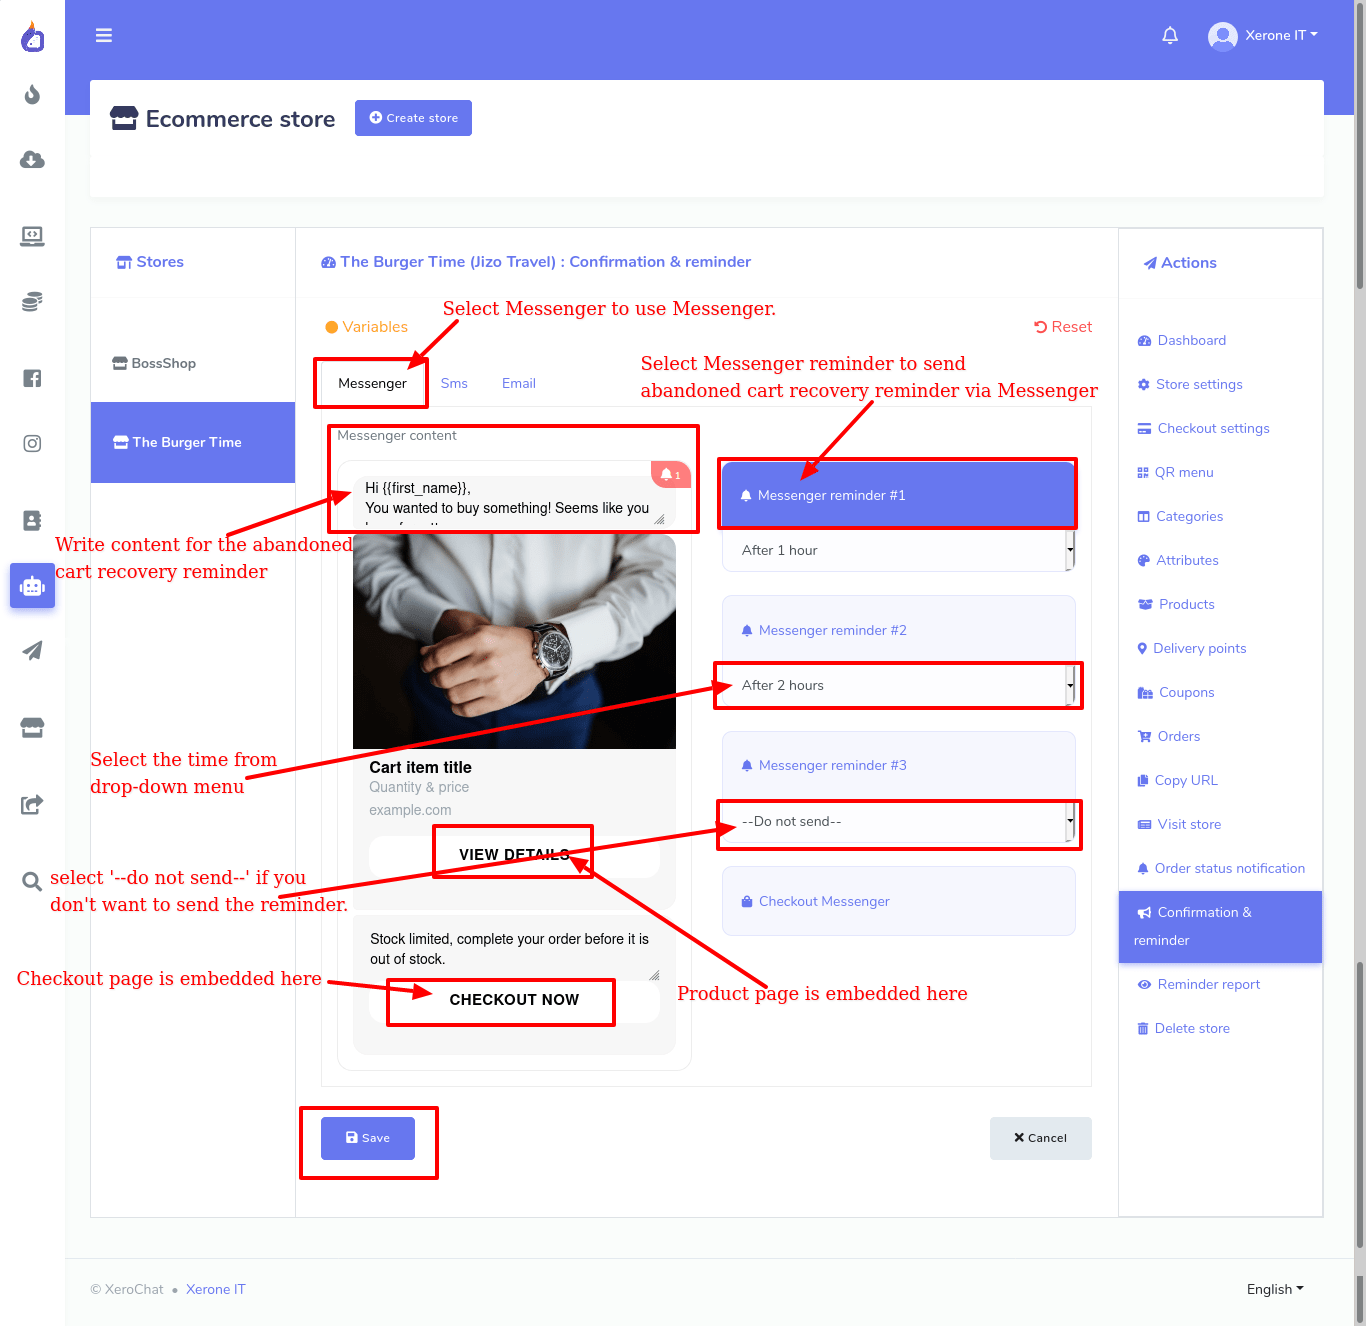
How to fill-out the form:
First, you have to select either Messenger, Sms, or Email. Then you will see a list of three options. These three options can send three abandoned cart recovery reminder.
On each of the options, ‘Do not send’ is selected by default. Click on it, and drop-down menu with hours list– from one hour to 24 hours– will appear. Now select the hours when you want the abandoned cart recovery reminder to be sent.
You can, of course, edit the default text for the message content in the content box. That is, you can send a coupon code via the message to give a discount on the products added to the cart.
Confirmation message:
Likewise, you can make a setting for a confirmation message.
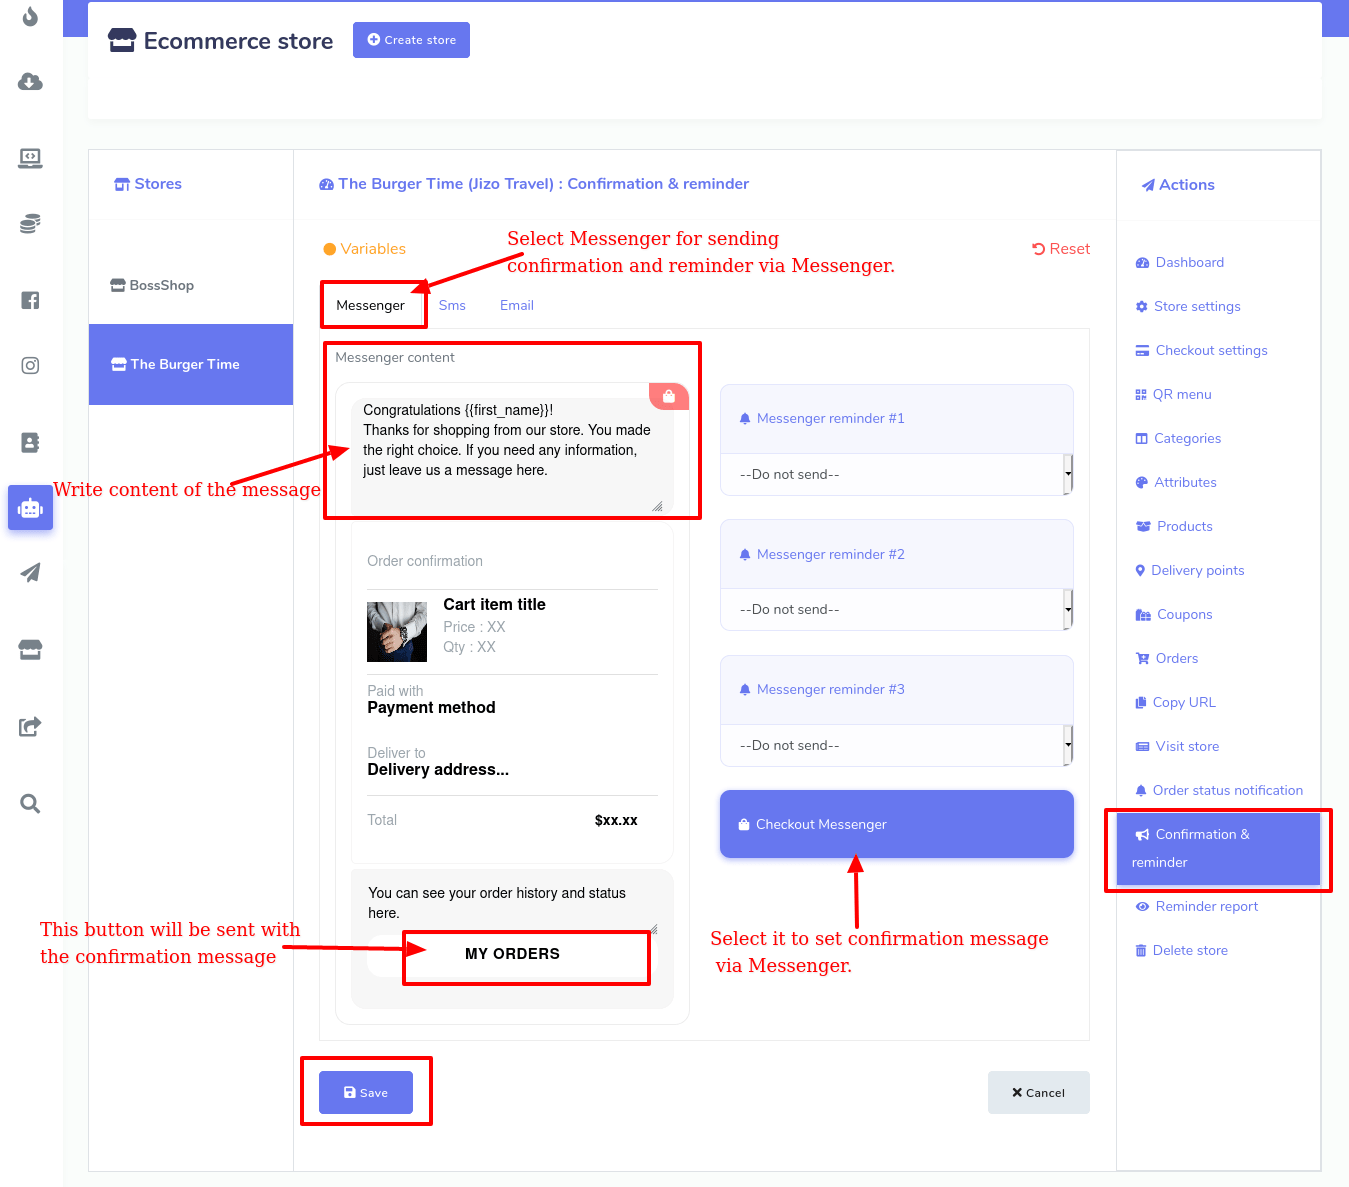
Well, if the clients return and finish the check out the reminders won’t be sent anymore. Instead, a confirmation will be sent to them.
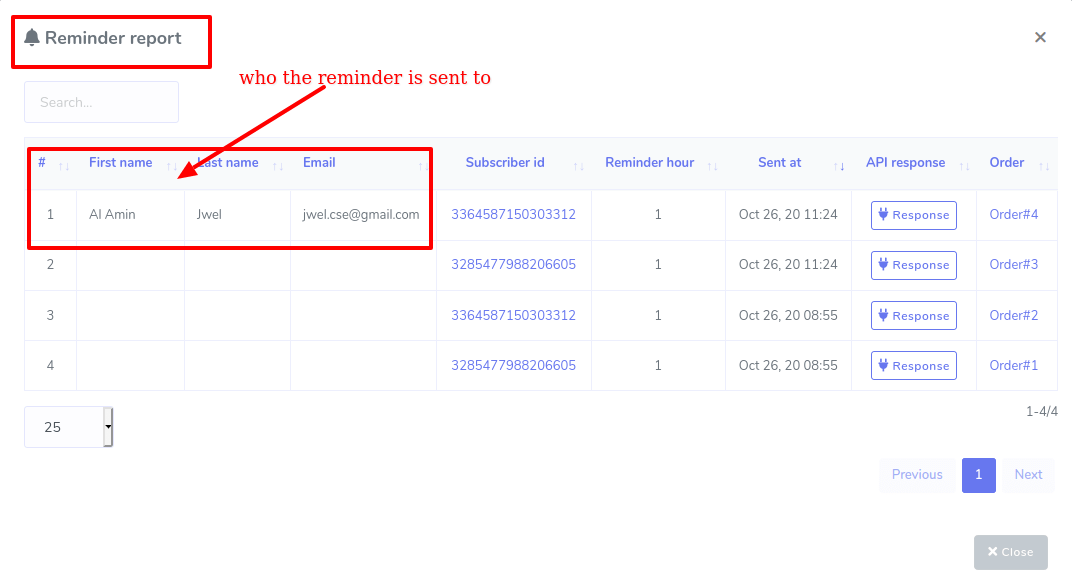
Reminder Report:
Clicking on the ‘Reminder report’ at the left panel of the Dashboard, you can see the reports of Abandoned Cart Reminder. Also, you can check the API responses of the reminders by clicking on ‘API response’ button.
QR menu:
After you have finished creating your virtual restaurant, you need the QR codes so that your clients can access the digital menu of your restaurant by scanning the QR code.
To get the QR codes, click on the ‘QR menu’ and instantly, the ‘QR menu’ page will appear with two QR codes– one for messenger and the other for browsers.
Well, to download the QR codes, click on the downloads buttons under the QR codes.
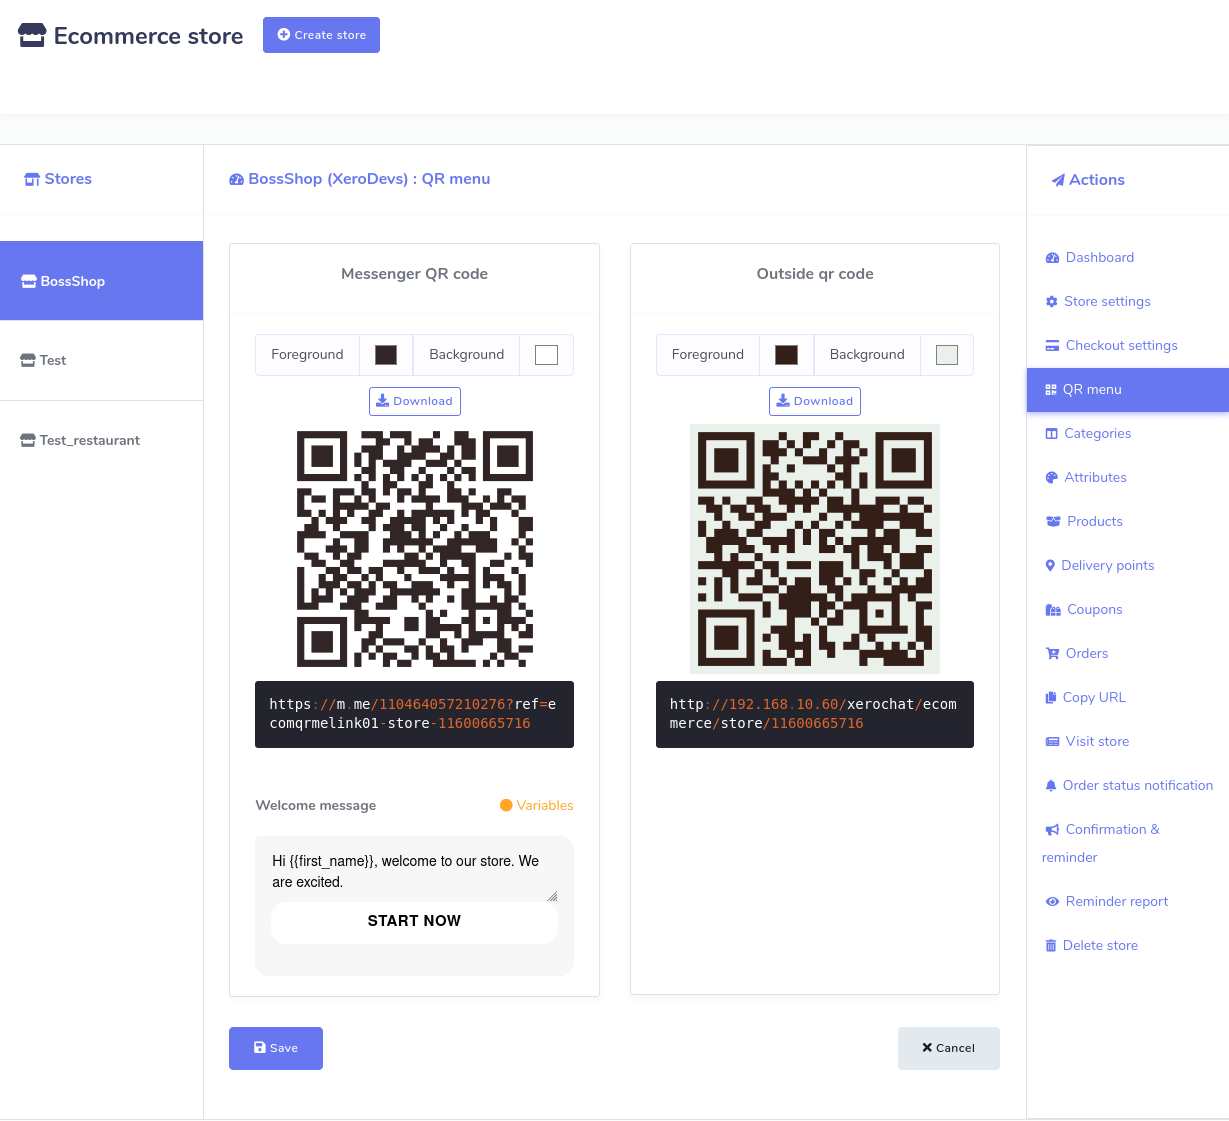
Now print the QR codes and attach the printed copy with a QR menu holder and place them on the tables so that your client can scan the QR code easily– Just as a client scan the QR codes, a digital menu will appear on their mobile screens inside messenger or on browsers. As for the browser, the clients have to create a account and then log in.
From the virtual menu, your clients can choose foods and give orders without talking to the waiters.
Visit store:
Now click on the ‘Visit store’, to see the outlook of your virtual restaurant.
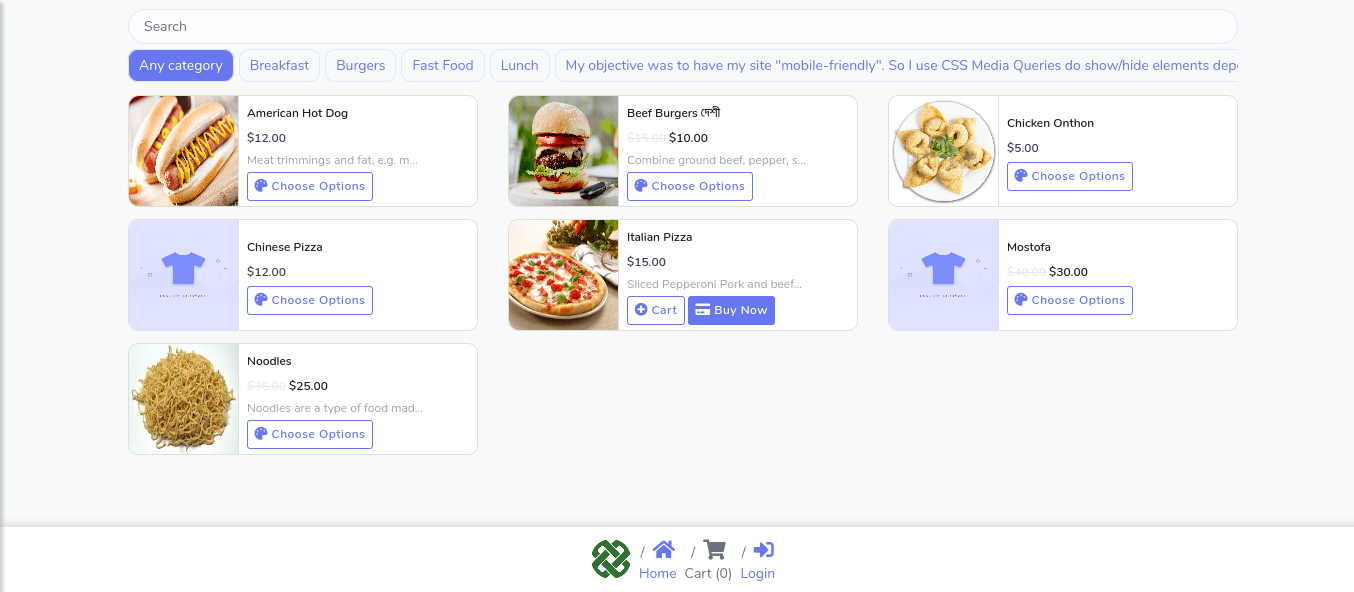
I hope that you have followed the commands and have created the virtual restaurant that will generate QR menu for your restaurant.
Thank you for reading the blog.